Mazda 3 Service Manual: Automatic Transaxle Fluid (ATF) Adjustment [Fw6 A EL]
CAUTION:
-
Only adjust the ATF level when the ATF temperature is 45—55 °C {113—131 °F}. If the ATF level is incorrect, it could damage the transaxle.
-
Do not add ATF over the specification. Otherwise, the transaxle performance could be reduced and ATF could leak.
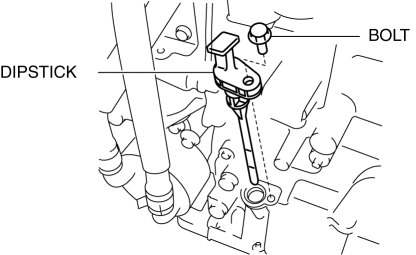
1. Remove aerodynamic undercover No.2..
2. Remove the dipstick securing bolt.
3. Remove the dipstick.
4. Adjust the ATF level.
a. Connect the M-MDS to the DLC-2 and display the PID TFT.
b. Warm up the engine until the ATF temperature is 50 °C {122 °F}
.
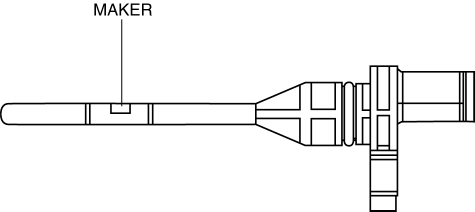
c. Remove the dipstick and wipe the ATF off using a rag while leaving the engine idling.
d. Insert the dipstick and pull it out again.
e. Verify that ATF is adhering to the central marker area on the dipstick.
-
If ATF is not adhering to the central marker area on the dipstick, adjust the ATF level to the central marker area.
NOTE:
-
The ATF color is blue.
-
Only use genuine ATF FZ for the FW6A-EL.
-
ATF type
-
Genuine ATF FZ
5. Insert the dipstick and remove the securing bolt.
-
Tightening torque
-
8—11 N·m {82—112 kgf·cm, 71—97 in·lbf}
6. Install aerodynamic undercover No.2..
 Automatic
...
 Automatic Transaxle Fluid (ATF) Inspection [FS5 A EL]
Automatic Transaxle Fluid (ATF) Condition Inspection
1. One way of determining whether the transaxle should be disassembled is by
noting:
If the ATF is muddy or varnished.
If the AT ...
Other materials:
Wastegate Control Solenoid Valve Inspection [Mzr 2.3 Disi Turbo]
Airflow Inspection
1. Remove the battery cover..
2. Disconnect the negative battery cable..
3. Remove the wastegate control solenoid valve..
4. Inspect the airflow between the ports under the following conditions.
If not as specified, replace the wastegate control solenoid val ...
Battery Electric Vehicle driving tips
When operating the Subaru Solterra, it is important to understand
that battery electric vehicles behave differently from conventional gasoline-powered
cars. At sustained high speeds—such as on highways or freeways—the efficiency
of electricity consumption decreases, which can significantly ...
Types of cameras and sensors used for the Advanced Park
The Subaru Solterra Advanced Park system relies on a network of high-precision
cameras and sensors designed to detect surrounding vehicles and environmental features,
helping the driver accurately identify suitable parking spaces and improve overall
parking efficiency.
Front camera
Sid ...
