Mazda 3 Service Manual: Combination Switch Removal/Installation
CAUTION:
-
Handling the air bag module improperly can accidentally deploy the air bag module, which may seriously injure you. Read the air bag system service warnings and cautions before handling the air bag module..
1. Switch the ignition to off.
2. Disconnect the negative battery cable and wait for 1 min or more.
.
3. Remove the following parts:
a. Driver-side air bag module.
b. Steering wheel.
c. Column cover.
d. Clock spring.
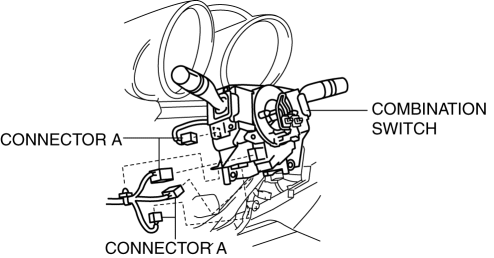
4. Disconnect the connector A.
5. Disconnect the connector B.
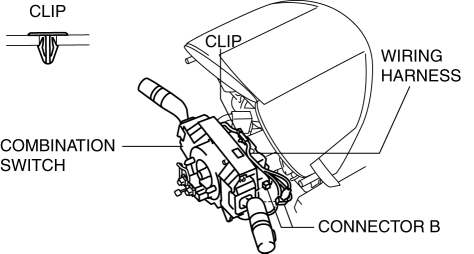
6. Detach the clips and set the wiring harness aside.
7. Remove the screws.
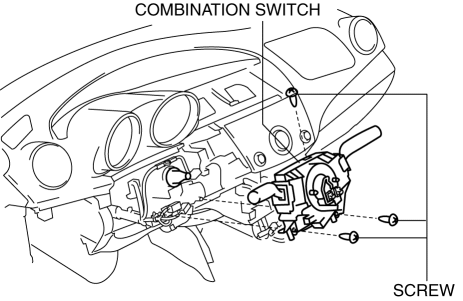
8. Remove the combination switch.
9. Install in the reverse order of removal.
 Combination Switch Disassembly/Assembly
CAUTION:
Handling the air bag module improperly can accidentally deploy the air bag
module, which may seriously injure you. Read the air bag system service warnings
and cautions before h ...
 Front Fog Light Switch Inspection
1. Disconnect the negative battery cable..
2. Remove the column cover..
3. Remove the light switch..
4. Verify that the continuity between the front fog light switch terminals is
as indicated ...
Other materials:
Blind Spot Monitoring (Bsm) Bracket Removal/Installation
1. Disconnect the negative battery cable..
2. Remove the rear combination light..
3. Remove the rear bumper..
4. Remove the BSM control module..
5. Remove the nuts.
6. Remove the clip.
7. Remove the BSM bracket.
8. Install in the reverse order of removal.
9. Perform the blind ...
Engine SST [Mzr 2.0, Mzr 2.5]
1: Mazda SST number
2: Global SST number
Example
1:49 UN01 052
2:310–D005
Spring lock coupler tool (green)
1: 49 C017 5A0
2: –
Engine support set
1:49 B011 105
2:–
Adapter
...
After Service Precaution [Mzr 2.0, Mzr 2.5]
WARNING:
Fuel line spills and leakage are dangerous. Fuel can ignite and cause serious
injuries or death and damage. When installing the fuel hose, perform “Fuel Leakage
Inspection” described below.
A person charged with static electricity could cause a fire or explosion,
...
