Mazda 3 Owners Manual: Floor Mat
| WARNING
Make sure the fl oor mats are hooked on
the retention pins to prevent them from
bunching up under the foot pedals:
Using a fl oor mat that is not secured is
dangerous as it will interfere with the
accelerator and brake pedal operation,
which could result in an accident.
Do not install two fl oor mats, one on top of the other, on the driver's side: Installing two fl oor mats, one on top of the other, on the driver's side is dangerous as the retention pins can only keep one fl oor mat from sliding forward. If using a heavy duty fl oor mat for winter use always remove the original fl oor mat. Loose fl oor mat(s) will interfere with the foot pedal and could result in an accident. |
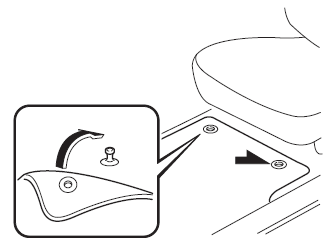
When setting a floor mat, position the floor mat so that its grommets are inserted over the pointed end of the retention posts.
 Hazardous Driving
WARNING
Be extremely careful if it is necessary to
downshift on slippery surfaces:
Downshifting into lower gear
while driving on slippery surfaces is
dangerous. The sudden change ...
 Rocking the Vehicle
WARNING
Do not spin the wheels at more than
56 km/h (35 mph), and do not allow
anyone to stand behind a wheel when
pushing the vehicle:
When the vehicle is stuck, spinning the
...
Other materials:
Tire Rotation
WARNING
Rotate tires periodically:
Irregular tire wear is dangerous. To
equalize tread wear for maintaining
good performance in handling and
braking, rotate the tires every 12,000
km (7,500 miles). However Mazda
recommends to rotate every 8,000 km
(5,000 miles) to help ...
Air Cleaner Element Inspection [Mzr 2.0, Mzr 2.5]
1. Remove the air cleaner element..
2. Inspect the following items:
Has the replacement interval come?
Is the air cleaner element soiled, damaged, or bent?
Are the air cleaner case and the air cleaner element correctly sealed?
Is the correct air cleaner element inst ...
Steering Wheel And Column Removal/Installation [Without Advanced Keyless Entry
And Push Button Start System]
WARNING:
Handling the air bag module improperly can accidentally operate (deploy)
the air bag module, which may seriously injure you. Read the service warnings
before handling the air bag module..
1. Remove the driver-side front scuff plate..
2. Remove the driver-side front sid ...
