
Mazda 3 Service Manual: Light Switch Inspection
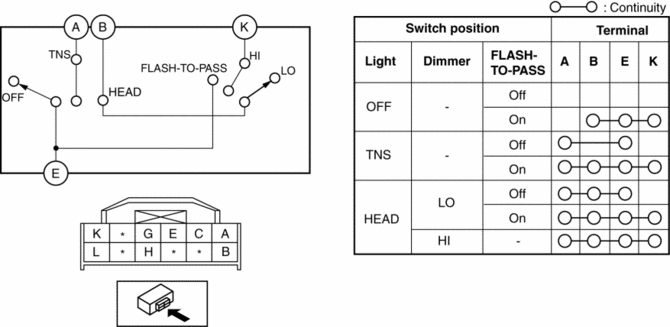
Vehicles Without Auto Light System
1. Disconnect the negative battery cable..
2. Remove the column cover..
3. Remove the light switch..
4. Verify that the continuity between the light switch terminals is as indicated in the table.
-
If not as indicated in the table, replace the light switch.
Light Switch
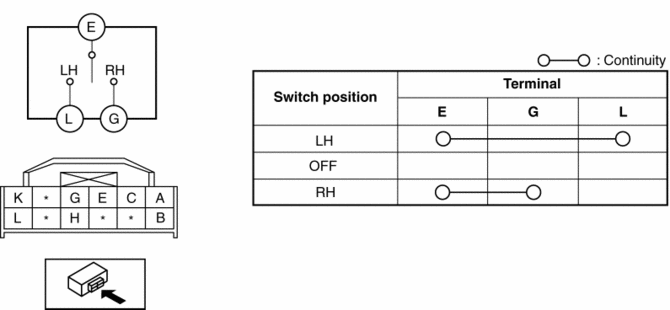
Turn Switch
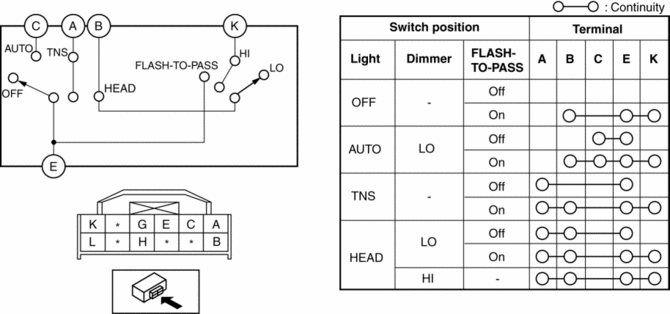
Vehicles With Auto Light System
1. Disconnect the negative battery cable..
2. Remove the column cover..
3. Remove the light switch..
4. Verify that the continuity between the light switch terminals is as indicated in the table.
-
If not as indicated in the table, replace the light switch.
Light Switch
Turn Switch

 Light Switch Removal/Installation
1. Disconnect the negative battery cable..
2. Remove the column cover..
3. Disconnect the connector.
4. Remove the screws shown in the figure, then remove the light switch by pulling
it in ...
Other materials:
Cargo Compartment Light Inspection
1. Disconnect the negative battery cable..
2. Remove the cargo compartment light..
3. Verify that the continuity between the cargo compartment light terminals is
as indicated in the table.
If not as indicated in the table, inspect the bulb. If there is no malfunction,
replace th ...
Supplier Identification Procedure [Audio]
Identification Using the Label or Inscribed Lettering
1. Disconnect the negative battery cable..
2. Remove the center panel..
3. Remove the audio unit..
4. Verify the supplier by referring to the label attached to each unit.
Verify Using the Diagnostic Assist Function
Without display
...
Plastic Part Maintenance
When cleaning the plastic lenses of the
lights, do not use gasoline, kerosene,
rectified spirit, paint, thinner, highly
acidic detergents, or strongly alkaline
detergents. Otherwise, these chemical
agents can discolor or damage the
surfaces resulting in a significant loss
in functio ...
