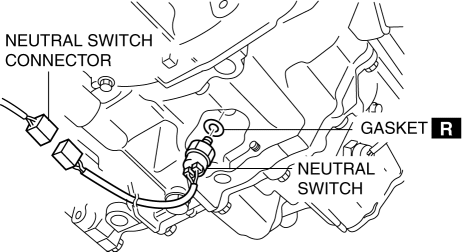
Mazda 3 Service Manual: Neutral Switch Removal/Installation [G66 M R]
1. Remove the battery cover..
2. Disconnect the negative battery cable.
3. Remove the battery component. (ex: battery, battery tray and PCM component).
4. Remove the aerodynamic under cover No.2..
5. Drain the oil from the transaxle..
6. Remove the neutral switch.

7. Install the neutral switch (with a new gasket) to the transaxle case.
-
Tightening torque
-
20—29 N·m {2.1—2.9 kgf·m, 15—21 ft·lbf}
8. Install the battery component. (ex: battery, battery tray and PCM component).
9. Install the battery cover..
10. Add the specified amount and type of oil..
11. Install the aerodynamic under cover No.2..
 Neutral Switch Removal/Installation [G35 M R]
1. Remove the battery cover..
2. Disconnect the negative battery cable.
3. Remove the battery component. (ex: battery, battery tray and PCM component)(See
BATTERY REMOVAL/INSTALLATION [MZR 2.0, ...
Other materials:
Cooling Fan Component Removal/Installation [Mzr 2.0, Mzr 2.5]
WARNING:
Never remove the cooling system cap or loosen the radiator drain plug while
the engine is running, or when the engine and radiator are hot. Scalding engine
coolant and steam may shoot out and cause serious injury. It may also damage
the engine and cooling system.
Tu ...
Power Steering Fluid Line Component Removal/Installation
NOTE:
The following procedure is for replacement of the parts shown in the figure.
Regarding replacement of the suction hose and return hose, refer to the electric
power steering oil pump component removal/installation..
Power Steering Pipe Component Removal/Installation
NOT ...
Declaration of Conformity
Keyless Entry System/Immobilizer System
Blind Spot Monitoring (BSM) System
NOTE
During printing time of this user manual the approvals listed above are granted.
WARNING
Change or modifi cations not expressively approved by the party
responsible for
compliance could voi ...

