Mazda 3 Service Manual: Passenger Compartment Temperature Sensor Inspection [Full Auto Air Conditioner]
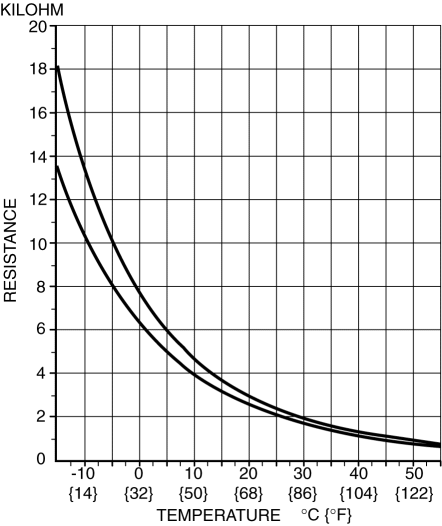
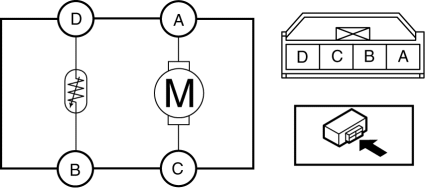
1. Measure the temperature around the passenger compartment temperature sensor and measure the resistance between passenger compartment temperature sensor terminals B and D.

-
If the characteristics of the passenger compartment temperature sensor are not as shown in the graph, replace the passenger compartment temperature sensor.
2. Connect battery positive voltage to passenger compartment temperature sensor terminal A and connect terminal C to ground to verify fan operation.

-
If there is any malfunction, replace the passenger compartment temperature sensor.
 Magnetic Clutch Inspection [Manual Air Conditioner]
1. Connect battery to terminal A of magnetic clutch and ground to A/C compressor
body.
SKYACTIV-G 2.0
MZR 2.0
MZR 2.5
2. Verify that the magnetic clutch operates.
If there i ...
 Passenger Compartment Temperature Sensor Removal/Installation [Full Auto Air
Conditioner]
1. Disconnect the negative battery cable..
2. Remove the following parts:
a. Front scuff plate.
b. Front side trim.
c. Dashboard under cover.
d. Upper panel.
e. Shift lever knob (MTX).
f ...
Other materials:
Bright-Metal Maintenance
Use tar remover to remove road tar and
insects. Never do this with a knife or
similar tool.
To prevent corrosion on brightmetal
surfaces, apply wax or chrome
preservative and rub it to a high luster.
During cold weather or in coastal areas,
cover bright-metal parts with a coating
...
General Procedures (Steering)
Wheel and Tire Installation
1. When installing the wheels and tires, tighten the wheel nuts in a criss-cross
pattern to the following tightening torque.
Tightening torque
88—118 N·m {9.0—12 kgf·m, 65—87 ft·lbf}
Connector Disconnection
1. Disconnect the negative battery cable ...
Theft Deterrent System Clearing Freeze Frame Data
1. Connect the M-MDS (IDS) to the DLC–2.
2. After the vehicle is identified, select the following items from the initialization
screen of the IDS.
Select “Body”.
Select "Burglar Service Functions".
3. Then, select the following item from the screen menu.
...
