Mazda 3 Owners Manual: Personalization Features
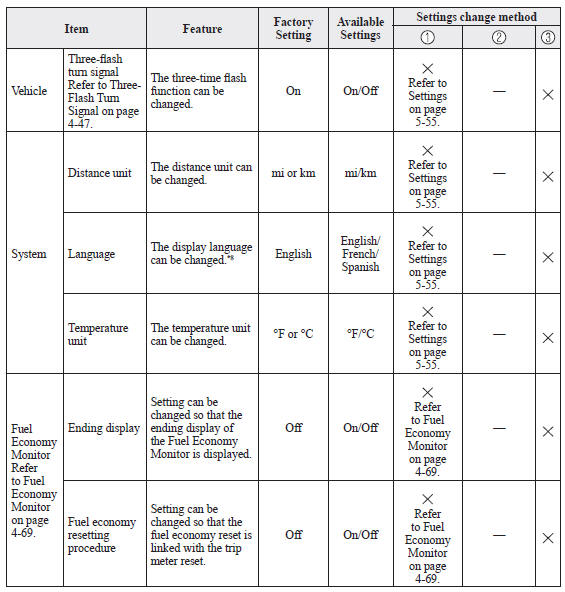
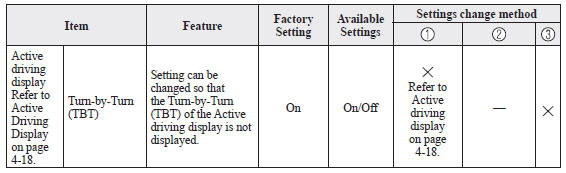
The following personalization features can be set or changed by an Authorized Mazda Dealer. Consult an Authorized Mazda Dealer for details.
Additionally, some of the personalization features can be changed by the customer depending on the feature.
Personalization features which can be changed differ depending on the market and specification.
- Settings can be changed by operating the center display screen.
- Settings can be changed by operating the vehicle switches.
- Settings can be changed by an Authorized Mazda Dealer.
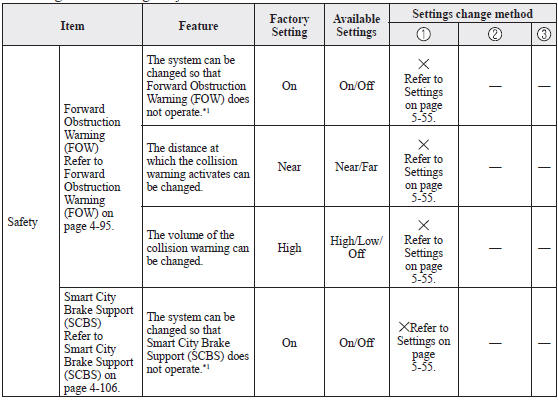
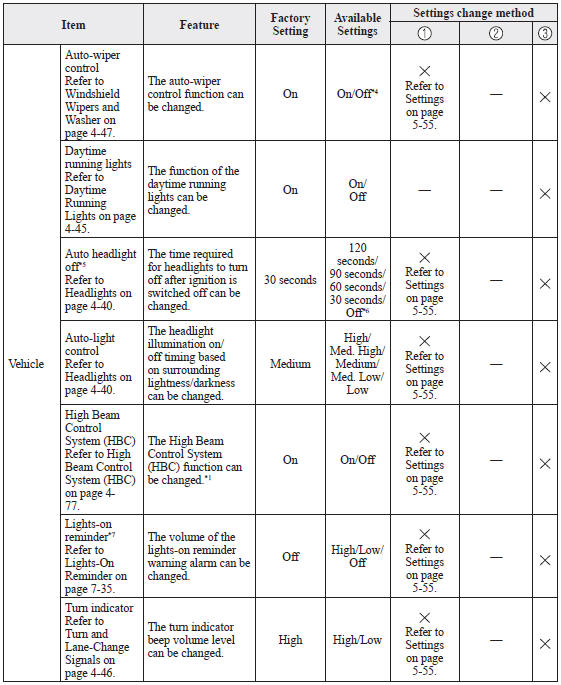
*1 Though these systems can be turned Off, doing so will defeat the purpose of the system and Mazda recommends that these systems remain On.
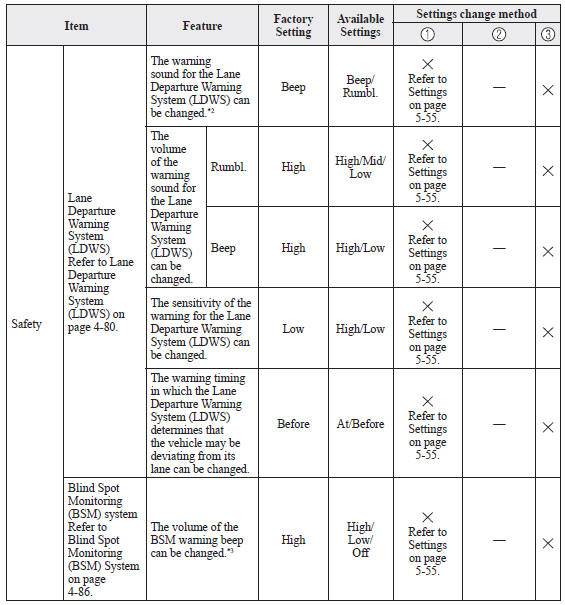
*2 For vehicles with an audio system other than the on-screen function type, the warning sound cannot be changed.
The warning sound is only a beep.
*3 Only the volume of the warning beep during Blind Spot Monitoring (BSM) operation can be changed. The volume of the warning beep during Rear Cross Traffic Alert (RCTA) operation cannot be changed.
*4 If the auto-wiper control is set to Off, the wiper lever
 position is set to intermittent
operation.
*5 If the setting is changed to Off, the following operation is performed according to the headlight switch position:
- At
 position:
Headlights turn off immediately after the ignition is switched off. - At any position other than
 : Headlights do not turn off
after the ignition is switched off.
*6 When set to Off, the lights-on reminder is operable.
*7 The setting of the lights-on reminder can be changed with the time setting of auto headlight off function set to Off. Refer to Lights-On Reminder on .
*8 Available only in display from the center display.
 Specifications
Engine
Electrical System
*1 Q-85 is designed for i-ELOOP system. Only Q-85 should be used to ensure
correct operation of i-ELOOP
system. Consult an Authorized Mazda Dealer for details.
...

Other materials:
Precaution
Intermittent Concern Troubleshooting
Vibration method
If malfunction occurs or becomes worse while driving on a rough road or when
the engine is vibrating, perform the steps below.
NOTE:
There are several reasons why vehicle or engine vibration could cause an
electrical m ...
Security Setting (Type A)
If a passcode is set, the system cannot be
activated unless the passcode is input.
NOTE
Do this function only when parked. It is
too distracting to attempt while driving
and you may make too many errors to be
effective.
Passcode setting
Press the pick-up button or talk button
with a sho ...
Steps for Determining the Correct
Load Limit
Steps for Determining Correct Load Limit-
Locate the statement “The combined weight of occupants and cargo
should never exceed
XXX kg or XXX lbs.” on your vehicle's placard.
Determine the combined weight of the driver and passengers that
will be riding in your
vehicle.
Subtract ...
