Mazda 3 Service Manual: Rear Door Removal/Installation
WARNING:
-
Removing the rear door without supporting it could cause the rear door to fall and cause serious injury. Always perform the procedure with at least another person to prevent the rear door from falling.
1. Disconnect the negative battery cable..
2. Remove in the order indicated in the table.
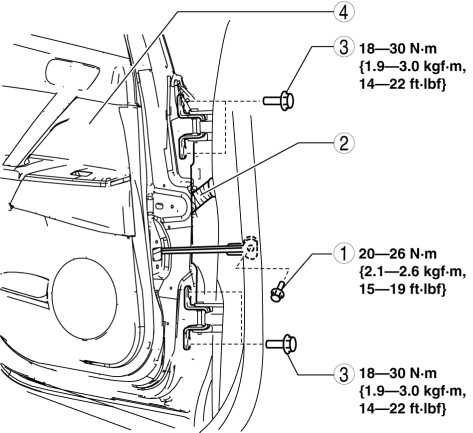
|
1 |
Bolt A |
|
2 |
Connector (See Connector Removal Note.) |
|
3 |
Bolt B |
|
4 |
Rear door |
3. Install in the reverse order of removal.
4. Adjust the rear door..
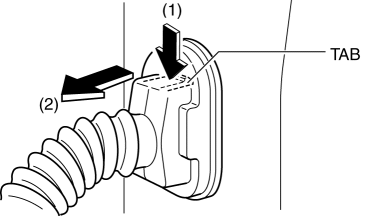
Connector Removal Note
1. While pressing the tab in the direction of arrow (1), disconnect the connector in the direction of arrow (2).
 Rear Door Pad Removal/Installation
1. Fully open the rear door glass.
2. Disconnect the negative battery cable..
3. Remove the following parts:
a. Rear door trim.
b. Rear door speaker.
c. Rear power window motor.
d. Rear do ...
 Rear Outer Handle Removal/Installation
1. Fully close the rear door glass.
2. Disconnect the negative battery cable..
3. Remove the rear door trim..
4. Remove the service hole cover.
5. Remove the screw from the service hole.
...
Other materials:
Drive Shaft Removal/Installation
CAUTION:
Performing the following procedures without first removing the ABS wheel-speed
sensor may possibly cause an open circuit in the wiring harness if it is pulled
by mistake. Before performing the following procedures, disconnect the ABS wheel-speed
sensor connector (axle side) ...
Voice Recognition (Type A)
In this section, the basic operation of the
voice recognition is explained.
Activating Voice Recognition
To Activate the Main Menu: Press the
pick-up button or talk button with a short
press.
Ending Voice Recognition
Use one of the following methods:
Press and hold the talk-button.
Pres ...
Front Passenger Occupant Classification System
First, please read "Supplemental Restraint System (SRS) Precautions"
carefully.
Front Passenger Seat Weight Sensor
Your vehicle is equipped with a front passenger seat weight sensors as a part
of the
supplemental restraint system. These sensors are located under both of the front
p ...
