Mazda 3 Service Manual: Seat Weight Sensor Inspection [Two Step Deployment Control System]
CAUTION:
-
If any of the following work is performed, perform the seat weight sensor inspection using the M-MDS.
-
Removal of the passenger-side seat
-
Loosening and retightening of passenger’s seat fixing bolts
-
Or, the vehicle is involved in a collision
-
If any of the following work is performed, perform the seat weight sensor calibration using the M-MDS..
-
Replacement with a new seat weight sensor
-
Replacement with a new seat weight sensor control module
-
Replacement with new passenger-side seat parts
-
Disassembly of the passenger-side seat
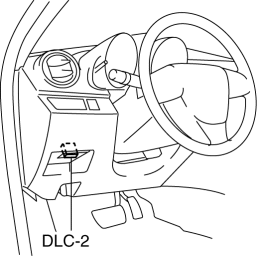
1. Connect the M-MDS (IDS) to the DLC-2.
2. After the vehicle is identified, select the following items from the initialization screen of the IDS.
a. Select “Body”.
b. Select “Restraints”.
3. Then, select item from the screen menu in the following order.
a. Select “Passenger Seat Weight Sensor ReZero”.
4. Then, select item from the SWS Calibration screen menu in the following order.
a. Select “(2)-When the passenger seat was removed and reinstalled.”
5. Perform inspection following the procedures on the M-MDS screen.
 Seat Weight Sensor Control Module Removal/Installation [Two Step Deployment
Control System]
Seat Weight Sensor Control Module Removal/Installation [Two Step Deployment
Control System]
CAUTION:
When the seat weight sensor control module is replaced with a new one, perform
the seat weight sensor calibration using the M–MDS..
1. Switch the ignition to off.
2. Disc ...
 Seat Weight Sensor Removal/Installation [Two Step Deployment Control System]
CAUTION:
When the seat weight sensor is replaced with a new one, perform the seat
weight sensor calibration using the M–MDS..
When replacing the seat weight sensor, replace it ...
Other materials:
Front Door Module Panel Removal/Installation
1. To access the glass installation bolt, position the front door glass so that
the distance from the top of the front door glass to the upper part of the front
beltline molding is approx. 80 mm {3.1 in}.
2. Disconnect the negative battery cable..
3. Remove the following parts:
a. Inne ...
Electric Vehicle system precautions
When operating or servicing the Subaru Solterra, it is essential
to remain aware of the presence of high-voltage components (nominal voltage approximately
355.2 V), including the traction battery, electricity supply unit, distinctive orange
high-voltage cables, and the electric motor. In addit ...
Interior Light Bulb Removal/Installation
1. Disconnect the negative battery cable..
2. Insert a tape-wrapped fastener remover into the service hole and pry with
the screwdriver in the direction shown by the arrow to remove the lens.
3. Remove the interior light bulb.
4. Install in the reverse order of removal. ...
