Mazda 3 Service Manual: Starter Interlock Switch Inspection [Mzr 2.3 Disi Turbo]
CAUTION:
-
Do not reuse the starter interlock switch if it is removed from the vehicle even once. Replace with a new starter interlock switch when installing.
1. Remove the battery cover..
2. Disconnect the negative battery cable..
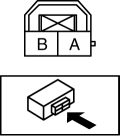
3. Disconnect the starter interlock switch connector.
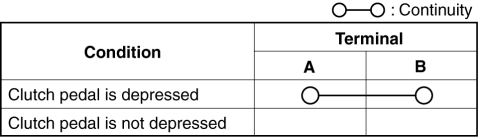
4. Verify that the continuity is as indicated in the table using a tester.
-
If the continuity is not as indicated in the table, replace the starter interlock switch.
.
 Starter Interlock Switch Inspection [Mzr 2.0, Mzr 2.5]
CAUTION:
Do not reuse the starter interlock switch if it is removed from the vehicle
even once. Replace with a new starter interlock switch when installing.
1. Remove the battery cove ...
 Starter Interlock Switch Inspection [Skyactiv G 2.0]
CAUTION:
Do not reuse the starter interlock switch if it is removed from the vehicle
even once. Replace with a new starter interlock switch when installing.
1. Remove the battery cove ...
Other materials:
Electronic sunshade
In the Subaru Solterra, the electronic sunshade is conveniently operated
using the overhead control switches, allowing you to regulate sunlight and cabin
brightness with ease and precision.
Operating the electronic sunshade
Open*
Close*
*: To stop the electronic sunshade at any i ...
Hood Release Cable Removal/Installation
1. Disconnect the negative battery cable..
2. Remove the battery tray..
3. Remove the Front mudguard (LH)..
4. Remove the hood release cable from clips A.
5. Remove the clips B.
6. Disconnect the hood latch from the hood release cable.
7. Remove the hood release cable from outside of ...
Fuel Economy Monitor
For vehicles with type B audio, the Control Status and Fuel Consumption are
switched and
displayed by operating each icon in the display.
In addition, after completing a trip, the total energy efficiency to date is
displayed in the
ending display when the ending display is turned on.
Se ...
