Mazda 3 Owners Manual: Transmitter
NOTE
- (With theft-deterrent system)
- The hazard warning lights flash when the theft-deterrent system is armed or turned off.
- Refer to Theft-Deterrent System on .
- (With the advanced keyless function)
- A beep sound can be heard for confirmation when the doors and the liftgate/trunk lid are locked/unlocked using the key. If you prefer, the beep sound can be turned off.
- The volume of the beep sound can also be changed.
- Refer to Personalization Features on .
- Use the following procedure to change the setting.
- Switch the ignition off and close all of the doors and the liftgate/trunk lid.
- Open the driver's door.
- Within 30 seconds of opening the
driver's door, press and hold the
LOCK button on the key for 5
seconds or longer.
All of the doors and the liftgate/ trunk lid lock and the beep sound activates at the currently set volume.
(If the beep sound is currently set to not activate, it will not activate.) The setting changes each time the LOCK button on the key is pressed and the beep sound activates at the set volume. (If the beep sound has been set to not activate, it will not activate.)
- The setting change is completed by doing any one of the following:
- Switching the ignition to ACC or ON.
- Closing the driver's door.
- Opening the liftgate/trunk lid.
- Not operating the key for 10 seconds.
- Pressing any button except the LOCK button on the key.
- Pressing a request switch.
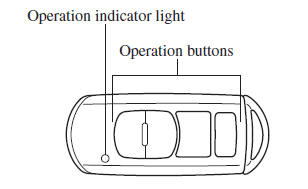
The operation indicator light flashes when the buttons are pressed.
Lock button
To lock the doors and the liftgate/trunk lid, press the lock button and the hazard warning lights will flsh once.
(With the advanced keyless function) A beep sound will be heard once.
To confirm that all doors and the liftgate/ trunk lid have been locked, press the lock button again within 5 seconds. If they are closed and locked, the horn will sound.

NOTE
- The doors and the liftgate/trunk lid can be locked by pressing the lock button while any other door or the liftgate/ trunk lid is open. The hazard warning lights will not flash.
- When the lock button is pressed while any door is open and then the door is closed, all the doors and the liftgate/ trunk lid are locked.
- Confirm that all doors and the liftgate/ trunk lid are locked visually or audibly by use of the double click.
- Make sure all doors and the liftgate/ trunk lid are locked after pressing the button.
- (With theft-deterrent system)
- When the doors are locked by pressing the lock button on the key while the theft-deterrent system is armed, the hazard warning lights will flash once to indicate that the system is armed.
Unlock button
To unlock the driver's door, press the unlock button and the hazard warning lights will flash twice.
(With the advanced keyless function) A beep sound will be heard twice.
To unlock all doors and the liftgate/trunk lid, press the unlock button again within 3 seconds and two more beep sounds will be heard.

NOTE
- The system can be set to unlock all doors by performing a single operation.
- Refer to Personalization Features on .
- Use the following procedure to change the setting.
- Switch the ignition off and close all of the doors and the liftgate/trunk lid.
- Open the driver's door.
- Within 30 seconds of opening the
driver's door, press and hold the
UNLOCK button on the key for 5
seconds or longer. The sound of
the doors locking/unlocking can be
heard.
After this, the system switches the setting each time the UNLOCK button is pressed (the sound of the doors locking/unlocking can be heard).
- The setting change is completed by doing any one of the following:
- Switching the ignition to ACC or ON.
- Closing the driver's door.
- Opening the liftgate/trunk lid.
- Not operating the key for 10 seconds.
- Pressing any button except the UNLOCK button on the key.
- Pressing a request switch.
Auto re-lock function)
- After unlocking with the key, all doors and the liftgate/trunk lid will automatically lock if any of the following operations are not performed within about 60 seconds. If your vehicle has a theft-deterrent system, the hazard warning lights will flash for confirmation.
- The time required for the doors to lock automatically can be changed.
- Refer to Personalization Features on .
- A door or the liftgate/trunk lid is opened.
- The ignition is switched to any position other than off.
- (With theft-deterrent system)
- When the doors are unlocked by pressing the unlock button on the key while the theft-deterrent system is turned off, the hazard warning lights will flash twice to indicate that the system is turned off.
Trunk button (4–door)
To open the trunk lid, press and hold the trunk button until the trunk lid opens.
Panic button
If you witness from a distance someone attempting to break into or damage your vehicle, press and hold the panic button to activate the vehicle's alarm.

NOTE The panic button will work whether any door or the liftgate/trunk lid is open or closed.
(Turning on the alarm)
Pressing the panic button for 1 second or more will trigger the alarm for about 2 minutes and 30 seconds, and the following will occur:
- The horn sounds intermittently.
- The hazard warning lights flash.
(Turning off the alarm) The alarm stops by pressing any button on the key.
 Keyless Entry System
This system uses the key buttons to
remotely lock and unlock the doors and
the liftgate/trunk lid, and opens the trunk
lid.
The system can start the engine without
having to take the key out of ...
 Operational Range
The system operates only when the driver
is in the vehicle or within operational
range while the key is being carried.
Starting the Engine
NOTE
Starting the engine may be possible
even if th ...
Other materials:
Locking, Unlocking with Key
All doors and the liftgate lock
automatically when the driver's door is
locked using the auxiliary key.
All doors and the liftgate unlock when the
driver's door is unlocked and the auxiliary
key is held in the unlock position for one
second or longer.
Turn the auxiliary key toward the fro ...
Passenger Side Air Bag Module Removal/Installation [Standard Deployment Control
System]
WARNING:
Handling the air bag module improperly can accidentally deploy the air bag
module, which may seriously injure you. Read the air bag system service warnings
and cautions before handling the air bag module..
NOTE:
When replacing the passenger-side air bag module af ...
Outside rear view mirrors
In the Subaru Solterra, the outside rear view mirrors can be precisely
adjusted to provide a clear and comprehensive view of the surrounding traffic, significantly
improving driving awareness and safety.
■ When using the outside rear view mirrors in a cold weather
During cold weather conditi ...
