Mazda 3 Service Manual: Trunk Lid Opener Switch Inspection
1. Disconnect the negative battery cable..
2. Remove the trunk lid trim..
3. Remove the high-mount brake light..
4. Remove the trunk lid opener switch..
5. Verify the continuity of trunk lid opener switch terminals A and B.
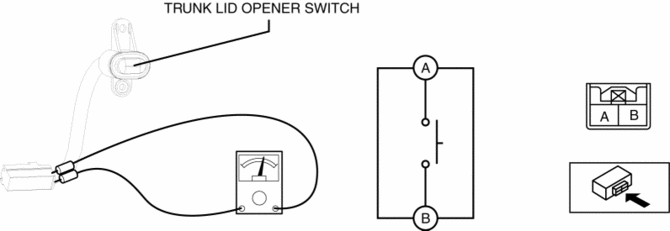
6. Verify that the continuity is as indicated in the table.
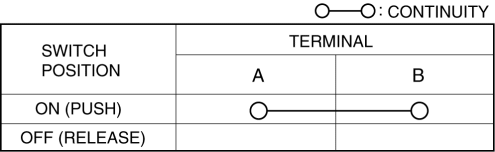
-
If the operation cannot be verified, replace the trunk lid opener switch.
 Trunk Side Upper Trim Removal/Installation
1. Remove the rear seat cushion..
2. Remove the rear scuff plate..
3. Remove the tire house trim..
4. Open the cap.
5. Remove the screw.
6. Remove the fasteners.
7. Pull the trunk side upp ...
 Trunk Lid Opener Switch Removal/Installation
1. Disconnect the negative battery cable..
2. Remove the trunk lid trim..
3. Remove the high-mount brake light..
4. Remove the screw.
5. Install in the reverse order of removal. ...
Other materials:
C Pillar Trim Removal/Installation
4SD
1. Remove the following parts:
a. Rear seat cushion.
b. Rear scuff plate.
c. Tire house trim.
2. Partially peel back the seaming welt.
3. Pull the C-pillar trim in the direction of the arrow (1), (2) shown in the
figure, then detaching clip A and B.
4. Cut the lead wire connec ...
Seat Weight Sensor Inspection [Two Step Deployment Control System]
CAUTION:
If any of the following work is performed, perform the seat weight sensor
inspection using the M-MDS.
Removal of the passenger-side seat
Loosening and retightening of passenger’s seat fixing bolts
Or, the vehicle is involved in a collision
...
No.7 Bsm Indicator Light Does Not Flash While Under Bsm Indicator Light Flashing
Conditions (With Combination Switch Operation (Turn Signal Switch)) [Blind Spot
Monitoring (Bsm)]
7
BSM indicator light does not flash while under BSM indicator light-flashing
conditions (with combination switch operation (turn signal switch))
Description
The BSM indicator light does not flash or illuminate continuously,
...
