Mazda 3 Owners Manual: Using LATCH Lower Anchor
Your Mazda is equipped with LATCH lower anchors for attachment of specially designed LATCH child-restraint systems in the rear seats. Both anchors must be used, otherwise the seat will bounce around and put the child in danger. Most LATCH child-restraint systems must also be used in conjunction with a tether to be effective. If they have a tether you must use it to better assure your child's safety.
| WARNING
Follow the manufacturer's instructions for the use of the
child-restraint system:
An unsecured child-restraint system is dangerous. In a sudden stop or a
collision it could
move causing serious injury or death to the child or other occupants.
Make sure the
child-restraint system is properly secured in place according to the
child-restraint system
manufacturer's instructions.
Never attach two child-restraint systems to the same LATCH lower anchor: Attaching two child-restraint systems to the same LATCH lower anchor is dangerous. In a collision, one anchor may not be strong enough to hold two child-restraint system attachments, and it may break, causing serious injury or death. If you use the seat position for another child-restraint system when an outboard LATCH position is occupied, use the center seat belts instead, and the tether if tether-equipped. Make sure the child-restraint system is properly secured: An unsecured child-restraint system is dangerous. In a sudden stop or a collision it could move causing serious injury or death to the child or other occupants. Follow the childrestraint system manufacturer's instructions on belt routing to secure the seat just as you would with a child in it so that nobody is tempted to put a child in an improperly secured seat later on. When not in use, remove it from the vehicle or fasten it with a seat belt, or latch it down to BOTH LATCH lower anchors for LATCH child-restraint systems. Make sure there are no seat belts or foreign objects near or around the LATCH childrestraint system: Not following the child-restraint system manufacturer's instructions when installing the child-restraint system is dangerous. If seat belts or a foreign object prevent the child-restraint system from being securely attached to the LATCH lower anchors and the child-restraint system is installed improperly, the child-restraint system could move in a sudden stop or collision causing serious injury or death to the child or other occupants. When installing the child-restraint system, make sure there are no seat belts or foreign objects near or around the LATCH lower anchors. Always follow the child-restraint system manufacturer's instructions. |
Installation on rear outboard seats
- First, adjust the front seat to allow clearance between the child-restraint system and the front seat .
- Make sure the seatback is securely latched by pushing it back until it is fully locked.
- Expand the area between the seat bottom and the seatback slightly to verify the locations of the LATCH lower anchors.
NOTE The markings above the LATCH lower anchors indicate the locations of the LATCH lower anchors for the attachment of a child-restraint system.
- Raise the head restraint to the top
locked position.
Refer to Head Restraints on .
- Secure the child-restraint system using BOTH LATCH lower anchors, following the child-restraint system manufacturer's instruction. Pull on the child-restraint to be sure both anchors are engaged.
- If your child-restraint system came equipped with a tether, that means it is very important to properly secure the tether for child safety. Please carefully follow the child-restraint system manufacturer's instructions when installing tethers.
| WARNING
Use the tether and tether anchor only
for a child-restraint system:
Using the tether or tether anchor to
secure anything but a child-restraint
system is dangerous. This could
weaken or damage the tether or tether
anchor and result in injury. Always route the tether strap between the head restraint and the seatback: Routing the tether strap on top of the head restraint is dangerous. In a collision the tether strap could slide off the head restraint and loosen the childrestraint system. The child-restraint system could move which may result in death or injury to the child. |
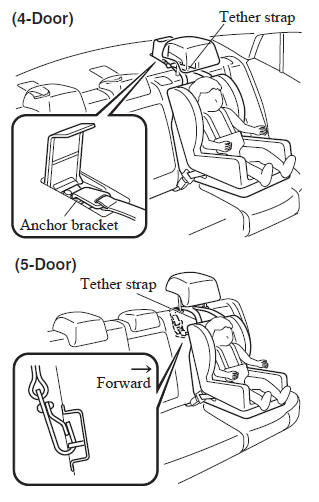
| Always attach the tether strap to the correct tether anchor position: Attaching the tether strap to the incorrect tether anchor position is dangerous. In a collision, the tether strap could come off and loosen the child-restraint system. If the childrestraint system moves it could result in death or injury to the child. |
Installation on rear center seat
The LATCH lower anchors at the center of the rear seat are much further apart than the sets of LATCH lower anchors for child-restraint system installation at other seating positions. Child-restraint systems with rigid LATCH attachments cannot be installed on the center seating position. Some LATCH equipped childrestraint systems can be placed in the center position and will reach the nearest LATCH lower anchors which are 443 mm (17.4 in) apart. LATCH compatible childrestraint systems (with attachments on belt webbing) can be used at this seating position only if the child-restraint system manufacturer's instructions state that the child-restraint system can be installed to LATCH lower anchors that are 443 mm (17.4 in) apart. Do not attach two childrestraint systems to the same LATCH lower anchor. If your child-restraint system has a tether, it must also be used for your child's optimum safety.
The procedure for installation on the rear outboard seats is the same.
LATCH lower anchor location
| WARNING Always route the tether strap between the head restraint and the seatback: Routing the tether strap on top of the head restraint is dangerous. In a collision the tether strap could slide off the head restraint and loosen the childrestraint system. The child-restraint system could move which may result in death or injury to the child. |
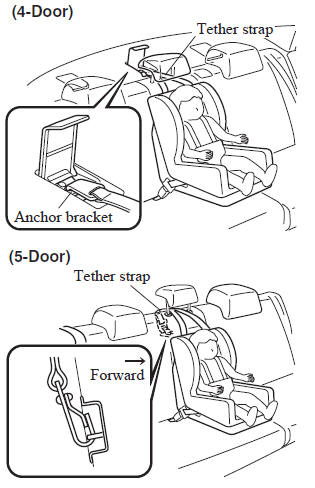
| Always attach the tether strap to the correct tether anchor position: Attaching the tether strap to the incorrect tether anchor position is dangerous. In a collision, the tether strap could come off and loosen the child-restraint system. If the childrestraint system moves it could result in death or injury to the child. |
 If You Must Use the Front Seat for
Children
If You Must Use the Front Seat for
Children
If you cannot put all children in the rear
seat, at least put the smallest children
in the rear and be sure the largest child
up front uses the shoulder belt over the
shoulder.
NEVER put a rear ...
 SRS Air Bags
...
Other materials:
Body Control Module (Bcm) Inspection
1. Remove the following parts:
a. Front scuff plate (LH).
b. Front side trim (LH).
c. Upper panel.
d. Shift knob (MTX).
e. Selector lever knob (ATX).
f. Shift panel.
g. Side wall.
h. Console.
2. Set the hood release lever out of the way..
3. Remove the lower panel. (driver-side). ...
Cargo Compartment Light Inspection
1. Disconnect the negative battery cable..
2. Remove the cargo compartment light..
3. Verify that the continuity between the cargo compartment light terminals is
as indicated in the table.
If not as indicated in the table, inspect the bulb. If there is no malfunction,
replace th ...
Specifications
Engine
Electrical System
*1 Q-85 is designed for i-ELOOP system. Only Q-85 should be used to ensure
correct operation of i-ELOOP
system. Consult an Authorized Mazda Dealer for details.
*2 Not for i-ELOOP system.
*3 This spark plug provides the SKYACTIV-G engine with optimum perfor ...
