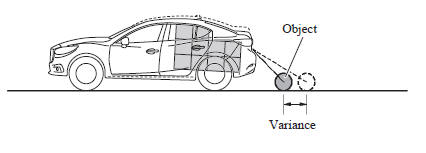
Mazda 3 Owners Manual: Variance Between Actual Road Conditions and Displayed Image
Some variance occurs between the actual road and the displayed road. Such variance in distance perspective could lead to an accident. Note the following conditions that may cause a variance in distance perspective.
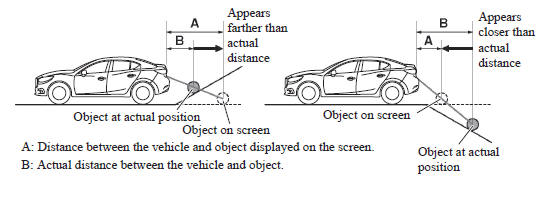
When the vehicle is tilted due to the weight of passengers and load
When the vehicle rear is lowered, the object displayed on the screen appears farther than the actual distance.
When there is a steep grade behind the vehicle
When there is a steep upgrade (downgrade) behind the vehicle, the object displayed on the screen appears farther (downgrade: closer) than the actual distance
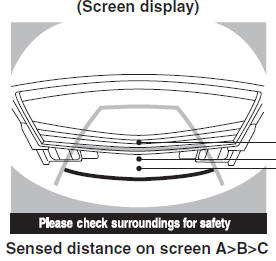
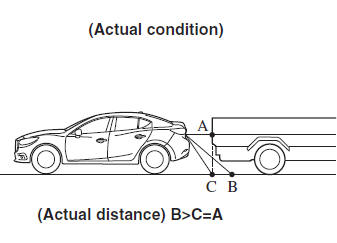
Three-dimensional object on vehicle rear
Because the distance guide lines are displayed based on a flat surface, the distance to the three-dimensional object displayed on the screen is different from the actual distance.
 Rear View Monitor Operation
The operation of the rear view monitor when reversing the vehicle varies
depending on
the traffic, road, and vehicle conditions. The amount of steering and the
timing also varies
depending on co ...
 Picture Quality Adjustment
WARNING
Always adjust the picture quality of the rear view monitor while the
vehicle is stopped:
Do not adjust the picture quality of the rear view monitor while driving
the vehic ...
Other materials:
Pilot Bearing Inspection [G35 M R]
1. Perform the following procedures.
a. Remove the battery cover..
b. Disconnect the negative battery cable.
c. Remove the battery component. (ex: battery, battery tray and PCM component).
d. Remove the air cleaner component..
e. Remove the exhaust manifold insulator installation bolts an ...
Rear Shock Absorber Disposal
1. Clamp a rear shock absorber on a flat surface or with the piston pointing
downwards.
2. Drill a 2—3 mm {0.08—0.11 in} hole at a point 40—50 mm {1.6—1.9
in} from the bottom of the tube, so that the gas can escape.
WARNING:
Whenever drilling into a rear shock absorber, w ...
Non Return Valve Inspection [Skyactiv G 2.0]
WARNING:
Fuel is very flammable liquid. If fuel spills or leaks from the pressurized
fuel system, it will cause serious injury or death and facility breakage. Fuel
can also irritate skin and eyes. To prevent this, always complete the “Fuel
Line Safety Procedure”, while referring ...
