Mazda 3 Service Manual: Air Intake Actuator Removal/Installation [Manual Air Conditioner]
1. Set the air intake mode to FRESH.
2. Disconnect the negative battery cable..
3. Remove the following parts:
a. Front scuff plate (Passenger-side).
b. Front side trim (Passenger-side).
c. Dashboard under cover.
d. Glove compartment.
e. Lower panel (Passenger-side).
f. Shower duct (Passenger-side).
4. Disconnect the harness clip from the blower case.
5. Disconnect the air intake actuator connector.
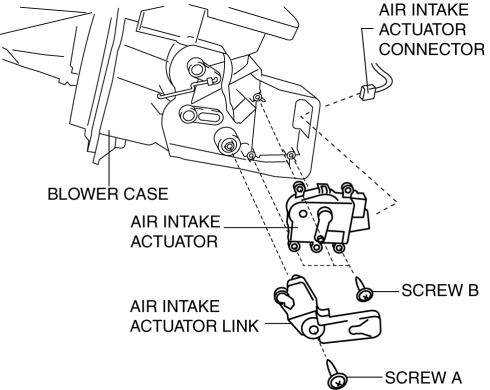
6. Remove the blower case..
7. Remove the screw A.
8. Remove the air intake actuator link.
9. Remove the screw B.
10. Remove the air intake actuator.
11. Install in the reverse order of removal.
 Air Intake Actuator Removal/Installation [Full Auto Air Conditioner]
1. Set the air intake mode to FRESH.
2. Disconnect the negative battery cable..
3. Remove the following parts:
a. Front scuff plate (Passenger-side).
b. Front side trim (Passenger-side).
c. ...
 Air Mix Actuator Inspection [Full Auto Air Conditioner]
CAUTION:
If the lever position exceeds the operation range shown in the figure, the
circuit in the actuator could be damaged. Always perform an actuator operation
inspection with the lev ...
Other materials:
Add-On Non-Genuine Parts and
Accessories
Non-genuine parts and accessories for Mazda vehicles can be found in stores.
These may fit your vehicle, but they are not approved by Mazda for use with
Mazda
vehicles. When you install non-genuine parts or accessories, they could affect
your vehicle's
performance or safety systems; the Maz ...
Electric Power Steering Oil Pump Component Disassembly/Assembly
CAUTION:
The internal parts of the EHPAS control module and motor could be damaged
if they receive an impact. Be careful when handling the EHPAS control module
and motor to prevent the component from getting hit. Replace the electric power
steering oil pump component if it has recei ...
Rear Stabilizer Removal/Installation
1. Remove in the order indicated in the table.
2. Install in the reverse order of removal.
1
Rear stabilizer control link
2
Rear stabilizer bracket
.
3
Rear stabilizer bushing
(See Rear Stabilizer, Rear Sta ...
