Mazda 3 Owners Manual: Anchor Bracket
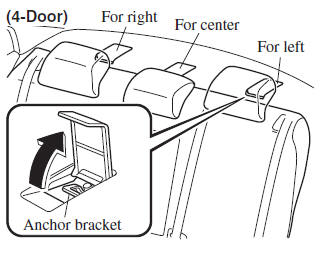
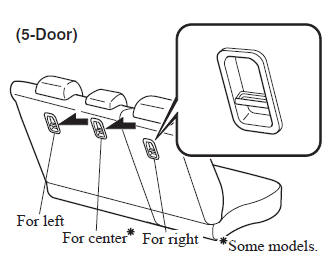
Anchor brackets for securing childrestraint systems are equipped in the vehicle. Locate each anchor position using the illustration.
To install a child-restraint system, always follow the instruction manual accompanying the child-restraint system.
Anchor bracket location
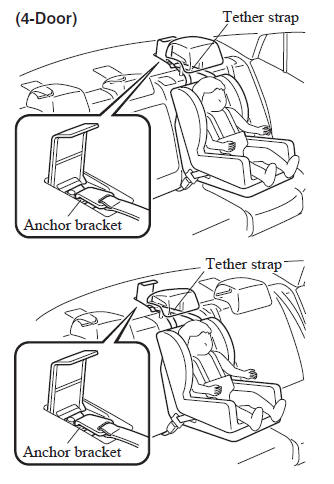
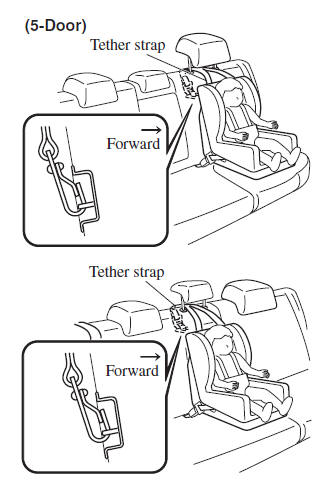
Use the indicated anchor bracket locations when installing a child-restraint system equipped with a tether.
| WARNING
Always attach the tether strap to the
correct tether anchor position:
Attaching the tether strap to the
incorrect tether anchor position is
dangerous. In a collision, the tether
strap could come off and loosen the
child-restraint system. If the childrestraint
system moves it could result
in death or injury to the child.
Always route the tether strap between the head restraint and the seatback: Routing the tether strap on top of the head restraint is dangerous. In a collision the tether strap could slide off the head restraint and loosen the childrestraint system. The child-restraint system could move which may result in death or injury to the child. |
 Installing Child-Restraint Systems
Accident statistics reveal that a child is
safer in the rear seat. The front passenger's
seat is clearly the worst choice for any
child under 12, and with rear-facing childrestraint
systems it is ...
 Using Automatic Locking Mode
Follow these instructions when using a child-restraint system, unless you are
attaching a LATCH-equipped childrestraint system to the rear LATCH lower
anchors. Refer to “Using LATCH Lower Anchor” ...
Other materials:
Restraints SST [Standard Deployment Control System]
49 H066 002
Deployment tool
49 D066 002
Adapter harness
49 L066 002
Adapter harness
49 B066 004
Adapter harness
49 N088 0A0
Fuel and Therm ...
Back Up Light Switch Removal/Installation [G35 M R]
1. Remove the battery cover..
2. Disconnect the negative battery cable.
3. Remove the battery component. (ex: battery, battery tray and PCM component).
4. Remove the aerodynamic under cover No.2..
5. Drain the oil from the transaxle..
6. Disconnect the back-up light switch connector and r ...
Engine Disassembly/Assembly [Mzr 2.0, Mzr 2.5]
1. Remove the engine from the transaxle..
2. Remove the generator..
3. Remove the exhaust system..
4. Remove the EGR valve..
5. Remove the intake-air system..
6. Remove the fuel injectors..
7. Remove the ignition coils..
8. Remove the crankshaft position (CKP) sensor..
9. Disassemble ...
