Mazda 3 Service Manual: Automatic Transaxle Fluid (ATF) Replacement [Fw6 A EL]
WARNING:
-
Do not perform the servicing while the ATF is hot. Otherwise, it could cause severe burns or serious injury.
1. Remove aerodynamic undercover No.2..
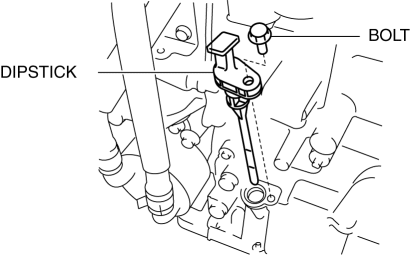
2. Remove the dipstick securing bolt.
3. Remove the dipstick.
4. Remove the drain plug and washer, and drain the ATF.
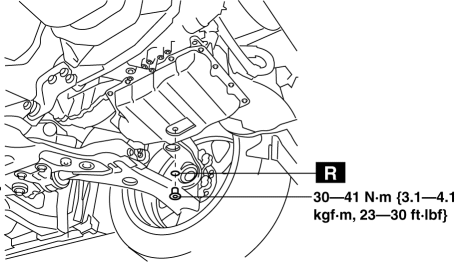
5. Install a new washer and drain plug.
-
Tightening torque
-
30—41 N·m {3.1—4.1 kgf·m, 23—30 ft·lbf}
6. Add ATF from the dipstick installation hole.
NOTE:
-
The ATF color is blue.
-
Only use genuine ATF FZ for the FW6A-EL.
-
ATF type
-
Genuine ATF FZ
-
Resupply amount (Reference)
-
ATF is drained from drain plug: 3.5—4.9 L {3.7—5.1 US qt, 3.1—4.3 Imp qt}
7. Adjust the ATF level..
8. Insert the dipstick and install the securing bolt.
-
Tightening torque
-
8—11 N·m {82—112 kgf·cm, 71—97 in·lbf}
9. Install aerodynamic undercover No.2..
 Automatic Transaxle Fluid (ATF) Replacement [FS5 A EL]
WARNING:
A hot transaxle and ATF can cause severe burns. Turn off the engine and wait
until they are cool before changing the ATF.
1. Drain the ATF.
a. Remove the oil dipstick.
b. ...
 Automatic Transaxle Removal/Installation [FS5 A EL]
CAUTION:
Secure the steering wheel using tape or a cable to prevent the steering shaft
from rotating after disconnecting the steering shaft. If the steering wheel
rotates after the steer ...
Other materials:
Glossary of Terms
Tire Placard: A label indicating the OE tire sizes, recommended inflation
pressure, and the
maximum weight the vehicle can carry.
Tire Identification Number (TIN): A number on the sidewall of each tire
providing
information about the tire brand and manufacturing plant, tire size, and date o ...
Scheduled Maintenance (U.S.A., Canada, and Puerto Rico)
Follow Schedule 1 if the vehicle is operated mainly where none of the
following conditions
(severe driving conditions)apply.
Repeated short-distance driving
Driving in dusty conditions
Driving with extended use of brakes
Driving in areas where salt or other corrosive materials are used
...
Vehicle Speed Sensor (VSS) Removal/Installation [FS5 A EL]
CAUTION:
If foreign materials are stuck to the sensor, disturbance by magnetic flux
can cause sensor output to be abnormal and thereby negatively affect control.
Make sure that foreign materials such as iron filings are not stuck to the sensor
during installation.
1. Perform t ...
