Mazda 3 Owners Manual: Clock
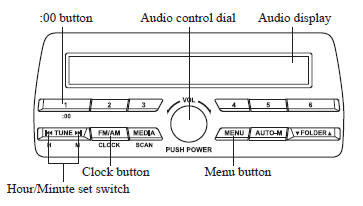
Setting the time
The clock can be set at any time when the ignition is switched to ACC or ON.
- To adjust the time, press the clock
button (
 ) for about 2 seconds
until a beep is heard. - The clock's current time will flash.
Time adjustment
- To adjust the time, press the hour/
minute set button (
 ,
,
 ) while the
clock's current time is flashing. - The hours advance while the hour set
button (
 ) is pressed. The
minutes advance while the minute set button ( ) is pressed.
- Press the clock button (
) again to start the clock.
Time resetting
- Press the clock button (
 ) for about
2 seconds until a beep is heard. - Press the :00 button ( 1 ).
- When the button is pressed, the time
will be reset as follows:
(Example)
12:01—12:2912:00 12:30—12:591:00
NOTE
- When the :00 button ( 1 ) is pressed, the seconds will start at “ 00 ”.
- Switching between 12 and 24-hour
clock time:
Press the menu button (
 )
)
several times until 12 and 24-hour clock time are displayed. Turn the audio control dial in either direction, select the desired clock setting while the preferred clock time is flashing
 Power/Volume/Sound Controls
Power ON/OFF
Switch the ignition to ACC or ON. Press
the power/volume dial to turn the audio
system on. Press the power/volume dial
again to turn the audio system off.
Volume adjustment
To a ...
 Operating the Radio
Radio ON
Press a band selector button ( )
to
turn the radio on.
Band selection
Successively pressing the band selector
button ( ) switches the bands as
follows: FM1→FM2→AM.
...
Other materials:
Side Air Bag Sensor No. 1 Removal/Installation [Two Step Deployment Control
System]
WARNING:
Handling the side air bag sensor improperly can accidentally operate (deploy)
the air bag module, which may seriously injure you. Read the air bag system
service warnings and cautions before handling the side air bag sensor..
1. Switch the ignition to off.
2. Disconnec ...
Liftgate Opener Switch Removal/Installation
1. Disconnect the negative battery cable..
2. Remove the following parts:
a. Liftgate upper trim.
b. Liftgate side trim.
c. Liftgate lower trim.
d. Liftgate latch and lock actuator.
3. Disconnect the connector.
4. Pull out the retainer in the direction of the arrow.
5. Remove the ...
Rear Door Module Panel Removal/Installation
1. Fully open the rear door glass.
2. Disconnect the negative battery cable..
3. Remove the following parts:
a. Rear door trim.
b. Rear door speaker.
c. Rear power window motor.
d. Rear door quarter glass.
e. Rear door glass.
4. Remove the clips securing the rear door wiring harness ...
