Mazda 3 Owners Manual: Closing the Hood
- Check under the hood area to make certain all filler caps are in place and all loose items (e.g. tools, oil containers, etc.) have been removed.
- Lift the hood, grasp the padded area on the support rod, and secure the support rod in the clip. Verify that the support rod is secured in the clip before closing the hood.
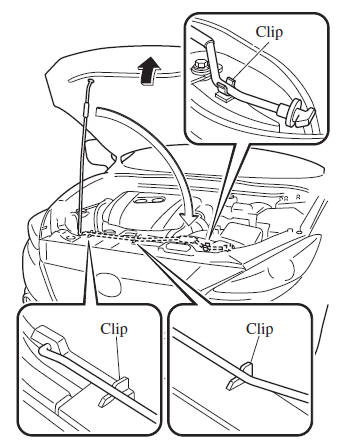
- Lower the hood slowly to a height of about 20 cm (7.9 in) above its closed position and then let it drop.
| CAUTION When closing the hood, do not push it excessively such as by applying your weight. Otherwise, the hood could be deformed. |
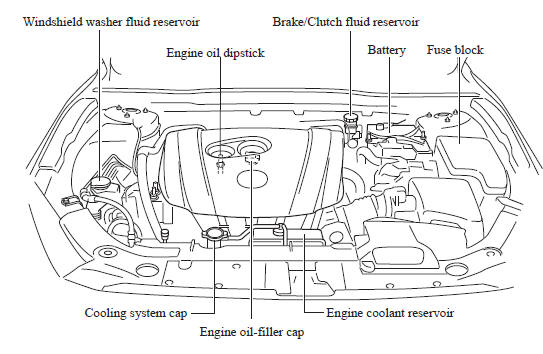
Engine Compartment Overview
 Opening the Hood
With the vehicle parked, pull the
release handle to unlock the hood.
Insert your hand into the hood opening,
slide the latch lever to the right, and lift
up the hood.
NOTE
T ...
 Engine Oil
NOTE
Changing the engine oil should be
performed by an Authorized Mazda
Dealer.
Refer to Introduction for
owner's responsibility in protecting your
investment. ...
Other materials:
Input/Turbine Speed Sensor Inspection [FS5 A EL]
CAUTION:
Water or foreign objects entering the connector can cause a poor connection
or corrosion. Be sure not to drop water or foreign objects on the connector
when disconnecting it.
On-Vehicle Inspection
1. Perform the following procedures.
a. Remove the battery cover..
b. ...
Oil Pump Removal/Installation [Mzr 2.3 Disi Turbo]
WARNING:
Hot engines and engine oil can cause severe burns. Turn off the engine and
wait until it and the engine oil have cooled.
A vehicle that is lifted but not securely supported on safety stands is dangerous.
It can slip or fall, causing death or serious injury. Never work ...
Fire Extinguisher Installation [Arab Gulf Cooperation Council]
WARNING:
Handling a front seat (with built-in side air bag) improperly can accidentally
operate (deploy) the air bag, which may seriously injure you. Read the service
warnings before handling a front seat (with built-in side air bag)..
CAUTION:
After removing a front seat ...
