Mazda 3 Owners Manual: Cup Holder
| WARNING
Never use a cup holder to hold hot
liquids while the vehicle is moving:
Using a cup holder to hold hot
liquids while the vehicle is moving is
dangerous. If the contents spill, you
could be scalded.
Do not put anything other than cups or drink cans in cup holders: Putting objects other than cups or drink cans in a cup holder is dangerous. During sudden braking or maneuvering, occupants could be hit and injured, or objects could be thrown around the vehicle, causing interference with the driver and the possibility of an accident. Only use a cup holder for cups or drink cans. |
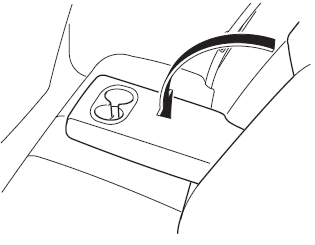
Front
Rear
The rear cup holder is on the rear center armrest.
 Accessory Sockets
Only use genuine Mazdaaccessories or the
equivalent requiring no greater than 120 W
(DC 12 V, 10 A).
Type A
The accessory sockets can be used
regardless of whether the ignition is on or
off.
...
 Bottle Holder
Bottle holders are on the inside of the
doors.
CAUTION
Do not use the bottle holders for
containers without caps. The contents
may spill when the door is opened or
closed.
...
Other materials:
Transaxle Oil Inspection [G66 M R]
1. Park the vehicle on level ground.
2. Remove the aerodynamic under cover No.2..
3. Remove the oil level plug and washer.
4. Verify that the oil is near the brim of the plug port.
If the oil level is lower than the low level, add the specified amount and
type of oil through the ...
Airflow Mode Actuator Removal/Installation [Full Auto Air Conditioner]
1. Set the air intake mode to FRESH.
2. Set the air mix mode to MAX COLD.
3. Disconnect the negative battery cable..
4. Remove the following parts:
a. Front doors.
b. Front scuff plate.
c. Front side trim.
d. Dashboard under cover.
e. Glove compartment.
f. Upper panel.
g. Shift l ...
Sirius Satellite Radio Antenna Feeder Inspection
SIRIUS Satellite Radio Antenna Feeder No.1
NOTE:
SIRIUS satellite radio antenna feeder No.1 is integrated with the dashboard
wiring harness.
1. Disconnect the negative battery cable..
2. Remove the following parts:
a. Passenger-side front scuff plate.
b. Passenger-side front ...
