Mazda 3 Service Manual: Electric Power Steering Oil Pump Component Disassembly/Assembly
CAUTION:
-
The internal parts of the EHPAS control module and motor could be damaged if they receive an impact. Be careful when handling the EHPAS control module and motor to prevent the component from getting hit. Replace the electric power steering oil pump component if it has received an impact.
-
If fluid or foreign matter penetrates the motor it could damage the motor. Be careful to not allow fluid or foreign matter to penetrate the motor. Replace the electric power steering oil pump component even if a small amount of fluid or foreign matter has penetrated the motor.
-
Do not use a vise to secure parts as the EHPAS control module or the motor could be damaged.
NOTE:
-
The following procedure is for replacement of the power steering oil pump. Before performing the procedure, inspect the EHPAS control module and motor visually, and replace the electric power steering oil pump component if a malfunction is found.
1. Drain the power steering fluid.
-
After draining the power steering fluid, wipe off any fluid remaining around the port area of the power steering oil pump using a clean rag.
2. Disassemble in the order indicated in the figure.
3. Assemble in the reverse order of disassembly.

|
1 |
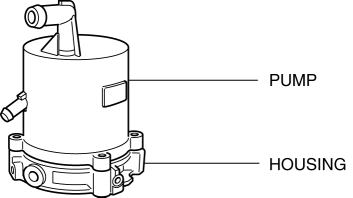
Power steering oil pump (See Power Steering Oil Pump Disassembly Note.) (See Bushing, Power Steering Oil Pump Assembly Note.) |
|
2 |
Bushing (See Bushing, Power Steering Oil Pump Assembly Note.) |
|
3 |
O-ring (See O-ring Disassembly Note.) (See O-ring Assembly Note.) |
|
4 |
EHPAS control module and motor |
Power Steering Oil Pump Disassembly Note
1. Remove the power steering oil pump installation bolts (4).
CAUTION:
-
If the bolts on the motor side are inadvertently loosened, the tightness of the EHPAS control module and motor cannot be maintained even when re-tightening the bolts. Be careful not to loosen the bolts on the motor side. If the bolts have been inadvertently loosened, replace the electric power steering oil pump component.
NOTE:
-
Remove the control module with it securely set on clean rags or a mat so that the EHPAS control module and motor do not get scratched.
2. Remove the power steering oil pump from the EHPAS control module and motor.
CAUTION:
-
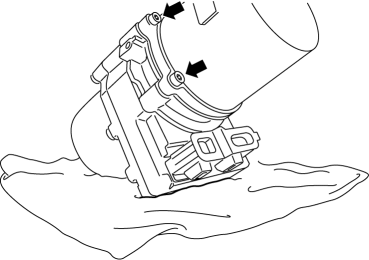
If the pump and housing become separated when removing the power steering oil pump, the housing could fall and damage the part. When removing, be careful to not allow the pump and housing to become separated.
-
Be especially careful that fluid does not get on the area shown in the figure as it could result in penetrating the EHPAS control and motor and damage by motor short when removing the power steering oil pump.
O-ring Disassembly Note
1. Remove the O-ring.
CAUTION:
-
When removing the O-ring, do not use a screwdriver or similar tool as it could damage the O-ring installation area of the motor. If the O-ring installation area is inadvertently damaged, replace the electric power steering oil pump component.
2. Wipe off any fluid from around the oil pump installation surface of the EHPAS control module and motor using a clean cloth.
O-ring Assembly Note
1. Verify that no foreign matter is adhering to the O-ring installation area and assemble the O-ring.
CAUTION:
-
If there is foreign matter adhering to the O-ring installation area, carefully remove it so that the O-ring installation area is not damaged. If the O-ring installation area is inadvertently damaged, replace the electric power steering oil pump component.
Bushing, Power Steering Oil Pump Assembly Note
1. Before assembling the bushing, verify that there is no fluid or foreign matter adhering to the oil pump installation surface of the EHPAS control module and motor, and wipe off any fluid or foreign matter using a clean cloth.
2. Install the bushing to the EHPAS control module and motor with the chamfer area oriented to the power steering oil pump side.
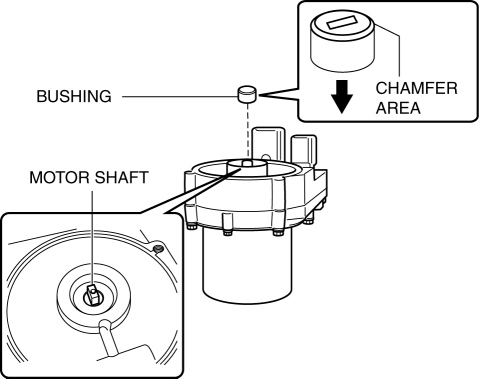
3. Insert the pump shaft of the power steering oil pump into the bushing and temporarily install the power steering oil pump.
NOTE:
-
The new power steering oil pump is secured to the pump and housing with a temporary band. Temporarily install with the band left on.
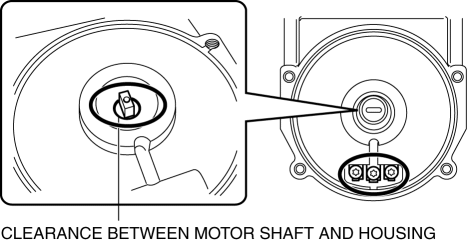
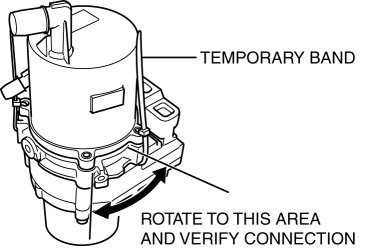
4. Rotate the pump left and right to an area in which the band does not contact the motor housing, and verify that the pump shaft is securely engaged with the motor shaft.
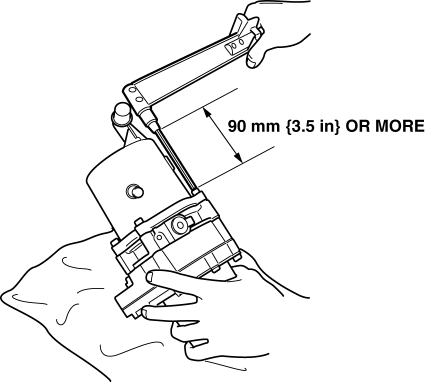
5. Remove the band and tighten the power steering oil pump installation bolt using a hexagonal bit socket with a bit area length of 90 mm {3.5 in} or more
.
NOTE:
-
Install the control module with it securely set on clean rags or a mat so that the EHPAS control module and motor do not get scratched.
-
Tightening torque
-
7—10 N·m {72—101 kgf·cm, 62—88 in·lbf}
 Drive Plate Removal/Installation [Fw6 A EL]
1. Remove the transaxle..
2. Remove in the order indicated in the table.
1
Drive plate installation bolts
(See Drive Plate Installation Bolts Removal Note.)
(See ...
 Electric Power Steering Oil Pump Component Removal/Installation
CAUTION:
Be careful not to drop the electric power steering oil pump component as
the internal parts of the EHPAS CM could be damaged. Replace the electric power
steering oil pump compon ...
Other materials:
Cooling System Service Warnings [Mzr 2.0, Mzr 2.5]
WARNING:
Never remove the cooling system cap or loosen the radiator drain plug while
the engine is running, or when the engine and radiator are hot. Scalding engine
coolant and steam may shoot out and cause serious injury. It may also damage
the engine and cooling system.
Tu ...
Operating Tips for CD Player
Condensation phenomenon
Immediately after turning on the heater
when the vehicle is cold, the CD or
optical components (prism and lens) in
the CD player may become clouded with
condensation. At this time, the CD will
eject immediately when placed in the unit.
A clouded CD can be corrected s ...
Seat Weight Sensor Calibration [Two Step Deployment Control System]
CAUTION:
If any of the following work is performed, perform the seat weight sensor
calibration using the M-MDS.
Replacement with a new seat weight sensor
Replacement with a new seat weight sensor control module
Replacement with new passenger-side seat pa ...
