Mazda 3 Service Manual: Fan Switch Inspection [Manual Air Conditioner]
1. Disconnect the negative battery cable..
2. Remove the following parts:
a. Upper panel.
b. Shift lever knob (MTX).
c. Selector lever knob (ATX).
d. Shift panel.
e. Side wall.
f. Console.
g. Front scuff plate.
h. Front side trim.
i. Dashboard under cover.
j. Glove compartment.
k. Hood release lever.
l. Lower panel.
m. Center panel.
n. Audio unit.
o. Climate control unit.
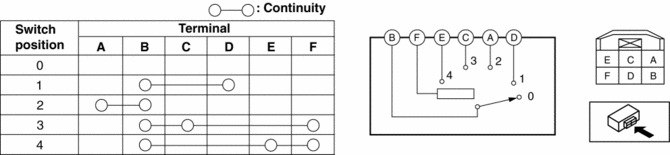
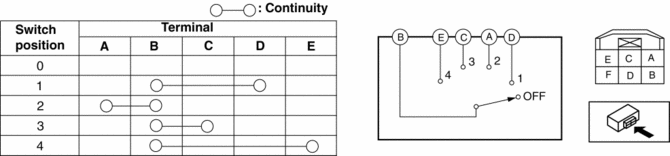
3. Verify that the continuity between the fan switch terminals as indicated in the table.
-
If there is any malfunction, replace the fan switch.
SKYACTIV-G 2.0
MZR 2.0, MZR 2.5
 Expansion Valve Removal/Installation
1. Disconnect the negative battery cable..
2. Discharge the refrigerant from the system..
CAUTION:
If moisture or foreign material enters the refrigeration cycle, cooling ability
will b ...
 Heater, Ventilation And Air Conditioning
Abbreviation
A/C
Air Conditioning
Features
The full-auto air conditioner has been adopted for vehicles with SKYACTIV-G
2.0.
Specifications
Full-au ...
Other materials:
Hill Launch Assist (HLA)
Hill Launch Assist (HLA) is a function
which assists the driver in accelerating
from a stop while on a slope. When
the driver releases the brake pedal and
depresses the accelerator pedal while
on a slope, the function prevents the
vehicle from rolling. The braking force is
maintained automati ...
Blower Motor Removal [Manual Air Conditioner]
NOTE:
The blower motor is located on the A/C unit as shown in the figure.
Perform the work from the front passenger side in the posture shown in the
figure.
1. Set the air intake mode to FRESH.
2. Disconnect the negative battery cable.
3. Remove the following ...
Rear Door Child Safety Locks
These locks are intended to help prevent
children from accidentally opening the
rear doors. Use them on both rear doors
whenever a child rides in the rear seat of
the vehicle.
If you slide the child safety lock to the
lock position before closing that door, the
door cannot be opened from th ...
