Mazda 3 Service Manual: Expansion Valve Removal/Installation
1. Disconnect the negative battery cable..
2. Discharge the refrigerant from the system..
CAUTION:
-
If moisture or foreign material enters the refrigeration cycle, cooling ability will be lowered and abnormal noise will occur. Always immediately plug all open fittings after removing any refrigeration cycle parts to keep moisture or foreign material out of the cycle.
3. Disconnect the cooler hose (LO) and cooler pipe. Do not allow compressor oil to spill..
4. Remove the following parts:
a. Front side trim (RH).
b. Front scuff plate.
c. Dashboard under cover.
d. Glove compartment.
e. Lower panel (passenger-side).
f. Side wall (RH).
g. Shower duct (RH).
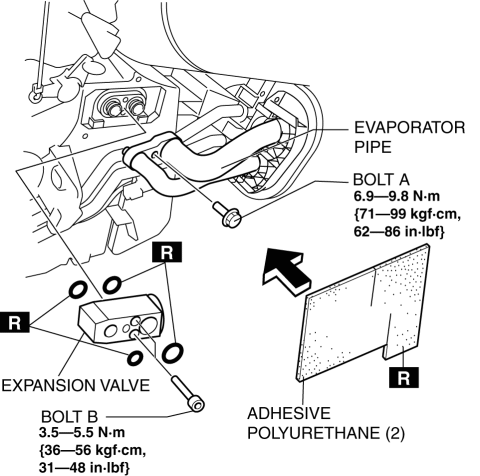
5. Remove the adhesive polyurethane (2)..
6. Remove the bolt A.
7. Disconnect the evaporator pipe.
8. Remove the bolt B.
9. Remove the expansion valve. Do not allow compressor oil to spill.
10. Install in the reverse order of removal.
11. Perform the refrigerant system performance test..
 Evaporator Inspection
1. Inspect the evaporator for damage, cracks, and oil leakage.
If there is any malfunction, replace the evaporator.
2. Visually inspect the fins for bending.
If there is any bend ...
 Fan Switch Inspection [Manual Air Conditioner]
1. Disconnect the negative battery cable..
2. Remove the following parts:
a. Upper panel.
b. Shift lever knob (MTX).
c. Selector lever knob (ATX).
d. Shift panel.
e. Side wall.
f. Consol ...
Other materials:
Volume/Display/Sound Controls
Volume adjustment
Turn the commander switch volume dial.
The volume switch on the steering switch
can also be pressed.
Display setting
Select the icon on the home
screen to
display the Settings screen.
Select the tab to select the item
you
would like to change.
Display OFF/Cloc ...
License Plate Light Bulb Removal/Installation
1. Disconnect the negative battery cable..
2. Insert a tape-wrapped fastener remover to the position shown in the figure,
release the tabs, and remove the lens.
3. Remove the license plate light bulb.
4. Install in the reverse order of removal. ...
Air Fuel Ratio (A/F) Sensor Removal/Installation [Mzr 2.0, Mzr 2.5]
WARNING:
A hot engine and exhaust system can cause severe burns. Turn off the engine
and wait until they are cool before removing the exhaust system.
1. Remove the battery cover..
2. Disconnect the negative battery cable..
3. Remove the plug hole plate..
4. Remove the air clea ...
