Mazda 3 Service Manual: Front Door Removal/Installation
WARNING:
-
Removing the front door without supporting it could cause the front door to fall and cause serious injury. Always perform the procedure with at least another person to prevent the front door from falling.
1. Disconnect the negative battery cable..
2. Remove in the order indicated in the table.
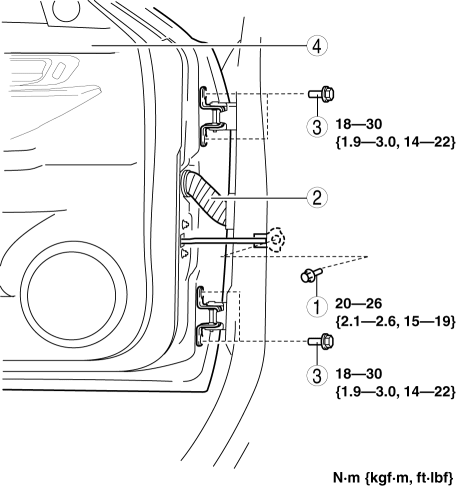
|
1 |
Bolt A |
|
2 |
Connector (See Connector Removal Note.) |
|
3 |
Bolt B |
|
4 |
Front door |
3. Install in the reverse order of removal.
4. Adjust the front door..
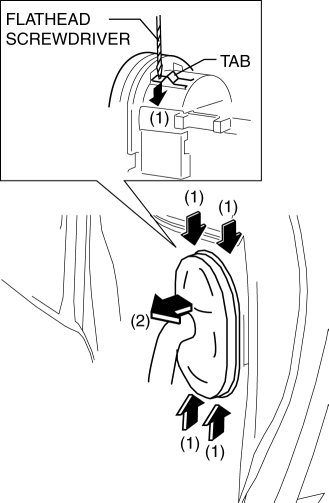
Connector Removal Note
1. Pull the rubber boot outward.

2. Press the tab in the direction of arrow (1) shown in the figure using a tape-wrapped flathead screwdriver, and remove the connector from the body in the direction of arrow (2) shown in the figure.
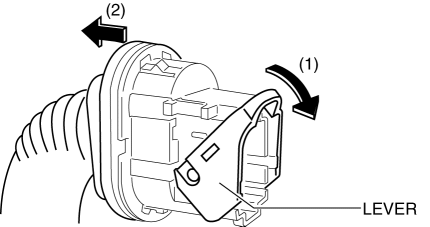
3. Lower the lever in the direction of arrow (1), and disconnect the connector in the direction of arrow (2).
 Front Door Module Panel Removal/Installation
1. To access the glass installation bolt, position the front door glass so that
the distance from the top of the front door glass to the upper part of the front
beltline molding is approx. 80 mm { ...
 Front Outer Handle Removal/Installation
1. To access the glass installation bolt, position the front door glass so that
the distance from the top of the front door glass to the upper part of the front
beltline molding is approx. 80 mm { ...
Other materials:
Knee Bolster Removal/Installation
1. Disconnect the negative battery cable..
2. Remove the following parts:
a. Driver-side front scuff plate.
b. Driver-side front side trim.
c. Hood release lever.
d. Upper panel.
e. Shift knob (MTX).
f. Selector lever knob (ATX).
g. Shift panel.
h. Side wall.
i. Console.
j. Dri ...
Front Fog Light Relay Removal/Installation
1. Disconnect the negative battery cable..
2. Remove the front mudguard.(RH).
3. Remove the front fog light relay case.
4. Remove the cover.
5. Remove the front fog light relay.
6. Install in the reverse order of removal..
Front Fog Light Relay Installation Note
1. Install the front ...
Joint Shaft Disassembly [Mzr 2.3 Disi Turbo]
1. Disassemble in the order indicated in the table.
1
Joint shaft component
.
2
Bearing
.
3
Dust seal (LH)
4
Joint shaft
5
Dust seal (RH)
...
