Mazda 3 Service Manual: Front Seat Back Component [Vehicles Without Power Seat System] Removal/Installation
WARNING:
-
Handling a front seat (with built-in side air bag) improperly can accidentally operate (deploy) the air bag, which may seriously injure you. Read the service warnings before handling a front seat (with built-in side air bag)..
CAUTION:
-
After removing a front seat, do not operate the slider lever. If the slider lever is operated, the left and right slide positions will deviate, and the slide adjuster may be damaged after the front seat is installed.
-
Verify that there are no malfunctions in the sliding mechanism after installing a front seat.
-
When performing the procedure with a front seat removed from the vehicle, perform the procedure on a clean rag so as not to damage or soil the seat.
-
When the passenger's seat is removed, perform the seat weight sensor inspection using the M-MDS after installing the passenger's seat..
-
When the passenger's seat is replaced with a new one, perform the seat weight sensor calibration using the M-MDS..
1. Switch the ignition to off.
2. Remove the battery cover..
3. Disconnect the negative battery cable and wait 1 min or more
..
4. Remove the front seat..
5. Remove the headrest.
6. Remove the side cover..
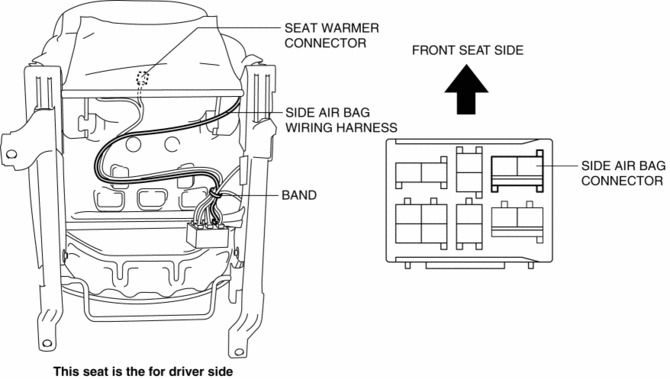
7. Cut the band securing the wiring harness.

8. Disconnect the side air bag connector and seat warmer connector (Vehicles with power seat system).
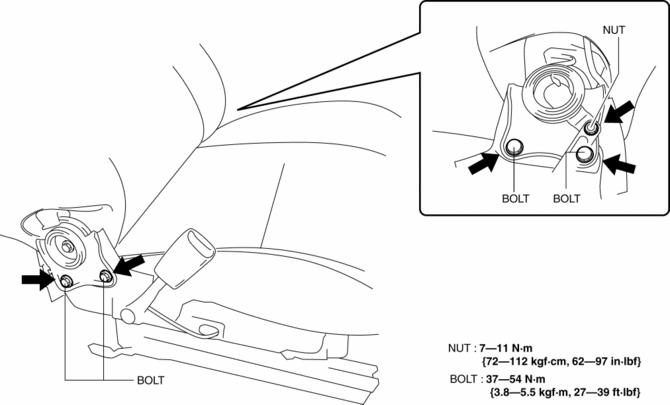
9. Remove the bolts and nut, then remove the front seat back component.

10. Install in the reverse order of removal.
 Child Restraint Seat Anchor Removal/Installation
4SD
1. Remove the cover.
2. Remove the bolt and child-restraint seat anchor.
3. Install in the reverse order of removal.
5HB
1. Remove the trunk end trim..
2. Remove the bolt and chi ...
 Front Seat Back Trim Removal/Installation
WARNING:
Handling a front seat (with built-in side air bag) improperly can accidentally
operate (deploy) the air bag, which may seriously injure you. Read the service
warnings before han ...
Other materials:
Locking Lug Nuts
If your vehicle has Mazda optional
antitheft wheel lug nuts, one on each
wheel will lock the tires and you must
use a special key to unlock them. This
key will attach to the lug wrench.
Register them with the lock manufacturer
by filling out the card provided in the
glove compartment and ma ...
Wheel Hub, Steering Knuckle Disassembly/Assembly
1. Disassemble in the order indicated in the table.
1
Dust Cover
2
Wheel hub component
.
3
Retaining clip
4
Wheel bearing
(See Wheel Bearing Removal Note.)
(See Wheel Bearing In ...
Airflow Mode Main Link Removal/Installation
1. Set the air intake mode to FRESH.
2. Set the air mix mode to MAX COLD.
3. Disconnect the negative battery cable..
4. Remove the following parts:
a. Front doors.
b. Front scuff plate.
c. Front side trim.
d. Dashboard under cover.
e. Glove compartment.
f. Upper panel.
g. Shift l ...
