Mazda 3 Owners Manual: Gear Shift Indicator
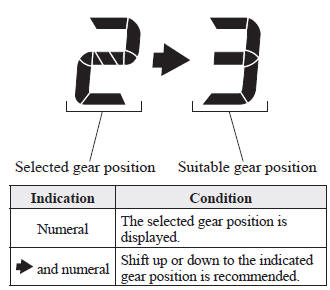
The gear shift indicator supports you to obtain optimum fuel economy and smooth driving. It displays the selected gear position in the instrument cluster as well as notifies the driver to change to the most suitable gear position corresponding to the actual driving condition.
| CAUTION Do not rely solely on the shift-up/ shift-down recommendations by indications. The actual driving situation might require shift operations diff erent from indication. To avoid the risk of accidents, the road and traffi c conditions have to be judged correctly by the driver before shifting. |
NOTE The gear shift indicator turns off when the following operations are performed.
- The vehicle is stopped.
- The vehicle is put in neutral.
- The vehicle is driven in reverse.
- The clutch is not fully engaged when accelerating from a stop.
- The clutch pedal remains depressed for 2 seconds or longer while driving.
 Manual Transaxle Shift Pattern
The shift pattern of the transaxle is
conventional, as shown.
Depress the clutch pedal all the way down
while shifting; then release it slowly.
Your vehicle is equipped with a device to
p ...
 Recommendations for Shifting (for
Vehicles without Gear Shift
Indication)
Recommendations for Shifting (for
Vehicles without Gear Shift
Indication)
Upshifting
For normal acceleration, Mazda
recommends these shift points:
(U.S.A. and Canada)
For cruising, Mazda recommends these
shift points:
(U.S.A. and Canada)
Downshifting
When yo ...
Other materials:
Manual Transaxle Shift Mechanism Removal/Installation [C66 M R]
1. Remove the battery cover..
2. Disconnect the negative battery cable..
3. Remove the shift lever.
a. Remove the upper panel..
b. Remove the shift lever knob.
c. Remove the shift panel..
d. Remove the side wall..
e. Remove the console..
f. Detach the clip as shown in the figure. ...
C Pillar Trim Removal/Installation
4SD
1. Remove the following parts:
a. Rear seat cushion.
b. Rear scuff plate.
c. Tire house trim.
2. Partially peel back the seaming welt.
3. Pull the C-pillar trim in the direction of the arrow (1), (2) shown in the
figure, then detaching clip A and B.
4. Cut the lead wire connec ...
Commander switch operation
NOTE
For safety reasons, some operations are disabled while the vehicle is being
driven.
Volume dial operation
Press the volume dial to switch the audio MUTE on and off.
Turn the volume dial to adjust the volume. The volume increases by turning the
dial
clockwise, and decreases by tur ...
