
Mazda 3 Owners Manual: Recommendations for Shifting (for Vehicles without Gear Shift Indication)
Upshifting
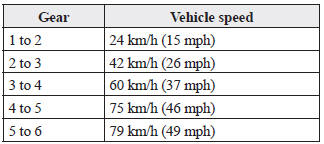
For normal acceleration, Mazda recommends these shift points: (U.S.A. and Canada)
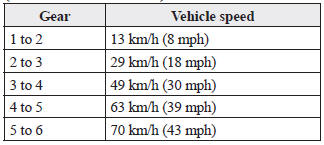
For cruising, Mazda recommends these shift points: (U.S.A. and Canada)
Downshifting
When you must slow down in heavy traffic or on a steep upgrade , downshift before the engine starts to overwork. This reduces the chance of stalling and gives better acceleration when you need more speed.
On a steep downgrade , downshifting helps maintain safe speed and prolongs brake life
 Gear Shift Indicator
The gear shift indicator supports you to
obtain optimum fuel economy and smooth
driving. It displays the selected gear
position in the instrument cluster as well
as notifies the driver to change t ...
 Automatic Transaxle Controls
Various Lockouts:
Indicates that you must depress
the brake pedal and hold in the lock-release
button to shift (The ignition must be switched ON).
Indicates the shift lever can be
shifted ...
Other materials:
Dashboard Upper Panel Removal/Installation
Vehicles Without Bose®
1. Disconnect the negative battery cable..
2. Remove the following parts:
a. Upper column cover.
b. Instrument cluster.
c. Center panel.
d. Center cover.
3. Remove the screw.
4. Pull up the dashboard upper panel in the direction of arrow shown in the figure,
...
Oil Control Valve (OCV) Removal/Installation [Mzr 2.0, Mzr 2.5]
1. Remove the battery cover..
2. Disconnect the negative battery cable..
3. Remove the plug hole plate..
4. Disconnect the wiring harness.
5. Remove the ignition coils..
6. Remove the ventilation hose.
7. Remove the oil level gauge.
8. Remove the cylinder head cover..
9. Remove in th ...
PID/Data Monitor Inspection [Two Step Deployment Control System]
1. Connect the M-MDS (IDS) to the DLC-2.
2. After the vehicle is identified, select the following items from the initialization
screen of the IDS.
a. Select “DataLogger”.
b. Select “Modules”.
c. Select “RCM”.
3. Select the applicable PID from the PID table.
4. Verify th ...
