Mazda 3 Service Manual: Glass Panel Adjustment
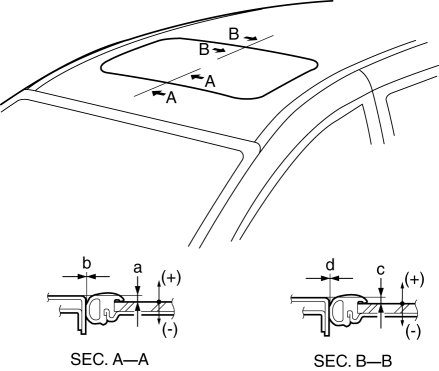
1. Fully close the glass panel.
2. Measure the gap and height between the glass panel and body.
-
If not as specified, loosen the glass panel installation screws and reposition the glass panel.
-
Clearance (4SD)
-
a: -2.4—0.2 mm {-0.09—0.01 in}
-
b: 0 mm {0 in}
-
c: -2.2—0.4 mm {-0.08—0.01 in}
-
d: 0 mm {0 in}
-
Clearance (5HB)
-
a: -2.3—0.3 mm {-0.09—0.01 in}
-
b: 0 mm {0 in}
-
c: -2.3—0.3 mm {-0.09—0.01 in}
-
d: 0 mm {0 in}
3. Tighten the installation screws.
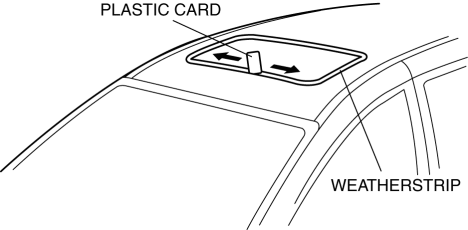
4. Insert a plastic card between the weatherstrip and the body of the vehicle. Verify that the sunroof is shut tightly (there is resistance when the plastic card is moved).
-
If the sunroof is not shut tightly, readjust by performing Steps 2 and 3.
 Front Drain Hose Removal
1. Set the air intake mode to FRESH.
2. Set the air mix mode to MAX COLD.
3. Disconnect the negative battery cable.
4. Remove the rain sensor cover. (Vehicles with auto light / wiper system).
...
 Glass Panel Removal/Installation
1. Fully close the glass panel.
2. Fully open the sunshade.
3. Remove the screws, and then remove the glass panel.
4. Peel the weatherstrip off the glass panel.
5. Install in the rever ...
Other materials:
Engine Coolant Temperature (ECT) Sensor Inspection [Mzr 2.0, Mzr 2.5]
ECT Sensor No.1
Resistance inspection
WARNING:
When the engine is hot, it can badly burn. Turn off the engine and wait until
it is cool before removing the ECT sensor.
1. Remove the battery cover..
2. Disconnect the negative battery cable..
3. Drain the engine coolant..
4. R ...
Driveline/Axle SST
49 F027 004
Attachment ø80
49 U027 005
Bearing installer
49 H027 002
Bearing remover
49 H034 201
Support block
49 H028 203
Block S
...
Voice Recognition (Type B)
In this section, the basic operation of the
voice recognition is explained.
Activating Voice Recognition
Press the talk button.
Ending Voice Recognition
Use one of the following methods:
Press the hang-up button.
Say, “Cancel”.
Operate the commander switch or the
center display (o ...
