Mazda 3 Service Manual: High Mount Brake Light Disassembly/Assembly
4SD
1. Disconnect the negative battery cable..
2. Remove the trunk lid trim..
3. Remove the high-mount brake light..
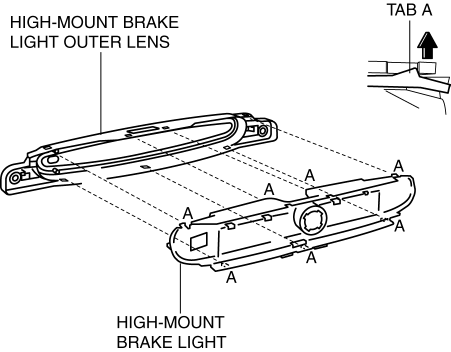
4. Remove the high-mount brake light outer lens.

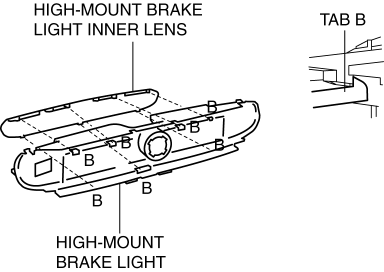
5. Remove the high-mount brake light inner lens.

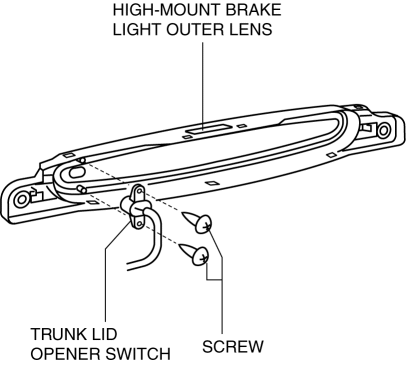
6. Remove the screws (with advanced keyless entry and push button start system).

7. Remove the trunk lid opener switch (with advanced keyless entry and push button start system).
8. Install in the reverse order of removal.
5HB
1. Disconnect the negative battery cable..
2. Remove the liftgate upper trim..
3. Remove the high-mount brake light..
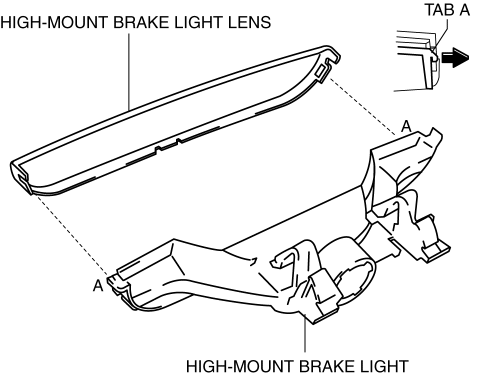
4. Remove the high-mount brake light lens.

5. Install in the reverse order of removal.
 High Mount Brake Light Bulb Removal/Installation
4SD
1. Disconnect the negative battery cable..
2. Remove the trunk lid trim..
3. Remove in the order indicated in the table.
1
Connector
2
...
 High Mount Brake Light Removal/Installation
4SD
1. Disconnect the negative battery cable..
2. Remove the trunk lid trim..
3. Disconnect the connector.
4. Remove the nuts.
5. While pressing the tabs shown in the figure, pull the hig ...
Other materials:
Fan Switch Inspection [Manual Air Conditioner]
1. Disconnect the negative battery cable..
2. Remove the following parts:
a. Upper panel.
b. Shift lever knob (MTX).
c. Selector lever knob (ATX).
d. Shift panel.
e. Side wall.
f. Console.
g. Front scuff plate.
h. Front side trim.
i. Dashboard under cover.
j. Glove compartment. ...
Contact Authorized Mazda Dealer and Have Vehicle Inspected
If any of the following warning lights or the indicator light turns on/flashes, the system may
have a malfunction. Contact an Authorized Mazda Dealer to have your vehicle
inspected.
...
If a Warning Light Turns On or Flashes
If any warning light turns on/flashes, take appropriate action for each
light. There is no
problem if the light turns off, however if the light does not turn off or turns
on/flashes again,
consult an Authorized Mazda Dealer.
(Vehicles with type B audio)
The warning contents can be verified o ...
