Mazda 3 Owners Manual: Inspecting Engine Oil Level
- Be sure the vehicle is on a level surface.
- Warm up the engine to normal operating temperature.
- Turn it off and wait at least 5 minutes for the oil to return to the oil pan.
- Pull out the dipstick, wipe it clean, and reinsert it fully.
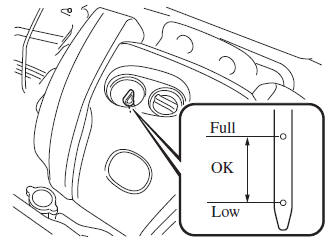
- Pull it out again and examine the level.
The level is normal if it is between Low and Full.
If it is near or below Low, add enough oil to bring the level to Full.
| CAUTION Do not overfi ll the engine oil. This may cause engine damage |
- Make sure the O-ring on the dipstick is positioned properly before reinserting the dipstick.
- Reinsert the dipstick fully.
 Vehicle Engine Control Unit Reset Procedure
NOTE
This procedure is intended for vehicles with the engine oil flexible
maintenance setting
selected.
After replacing the engine oil, have a repair shop such as an Authorized
Mazda Dealer
pe ...
 Engine Coolant
Inspecting Coolant Level
WARNING
Do not use a match or live fl ame in the
engine compartment. DO NOT ADD
COOLANT WHEN THE ENGINE IS HOT:
A hot engine is dangerous. If the
engine ...
Other materials:
Tire Rotation
To equalize tread wear, rotate the tires every 12,000 km (7,500 miles) at the
latest or sooner
if irregular wear develops. Mazda recommends to rotate every 8,000 km (5,000
miles) to
help increase tire life and distribute wear more evenly.
Inspect the tires for uneven wear and damage. Abno ...
Filament Inspection
1. Turn the ignition switch to the ON position.
2. Turn the rear window defroster switch on.
CAUTION:
Directly touching the rear window defroster filament with the lead of the
tester could damage it. Wrap aluminum foil around the end of the lead and inspect
the filament by touc ...
Front Door Glass Removal/Installation
1. To access the glass installation bolt, position the front door glass so that
the distance from the top of the front door glass to the upper part of the front
beltline molding is approx. 80 mm {3.1 in}.
2. Disconnect the negative battery cable..
3. Remove the inner garnish..
4. Remov ...
