Mazda 3 Owners Manual: Interior Equipment (View A)
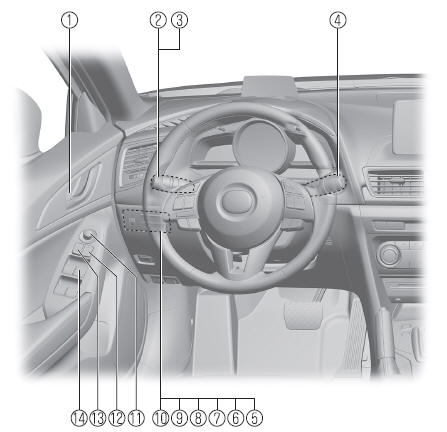
- Door-lock knob
- Turn and lane-change signal
- Lighting control
- Wiper and washer lever
- DSC OFF switch
- Tire pressure monitoring system set switch
- LDWS switch
- AFS OFF switch
- BSM OFF switch
- Headlight leveling switch
- Outside mirror switch
- Door-lock switch
- Power window lock switch
- Power window switches

- Audio control switches
- Instrument cluster
- Dashboard illumination knob
- Cruise control switches
- Hazard warning flasher switch
- Seat warmer switches
- Drive selection switch
- Push button start
- Steering shift switches
- Lock release lever
- Hood release handle
- Remote fuel-filller lid release
- Trunk release button

 Interior Equipment (View B)
SRS air bags
Active driving display
Climate control system
Rear window defogger switch
Audio system
CD player
Accessory sockets
External input terminal
Commander switch
Shift ...
Other materials:
Things to know before charging
Before charging the traction battery of the Subaru Solterra, it is
essential to carefully review the following precautions to ensure safe, efficient,
and reliable charging operations.
■ Safety functions
The Subaru Solterra is equipped with built-in safety mechanisms that prevent
the EV ...
Clock Switch Inspection
NOTE:
Clock switch built with the hazard warning switch.
1. Disconnect the negative battery cable..
2. Remove the clock switch..
3. Verify resistance between the clock switch terminals.
If the resistance is not as specified, replace the clock switch.
Between t ...
Tire information
Typical tire symbols
Location of treadwear indicators
Maximum load rating at the specified cold tire pressure for the Subaru Solterra
Maximum cold tire inflation pressure
This value indicates the highest pressure level permitted for safe tire inflation.
Tire size designation used ...
