Mazda 3 Owners Manual: Locking, Unlocking
Locking, Unlocking with Transmitter
All doors and the liftgate can be locked/ unlocked by operating the keyless entry system transmitter, refer to Keyless Entry System .
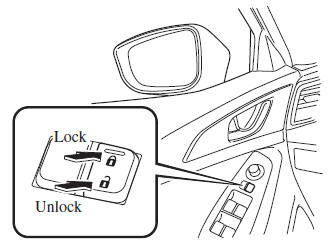
Locking, Unlocking with Door- Lock Switch
All doors and the liftgate lock automatically when the lock side is pressed. They unlock when the unlock side is pressed.
Driver's door
Front passenger's door

To lock all the doors and the liftgate from an open front door, press the lock side of the door lock switch and then close the door.
NOTE When locking the doors this way, be careful not to leave the key inside the vehicle.
 Locking, Unlocking with Request
Switch (With the advanced keyless
function)
Locking, Unlocking with Request
Switch (With the advanced keyless
function)
All doors and the liftgate can be locked/
unlocked by pressing the request switch
on the front doors while the key is being
carried.
(5–door)
The request switch on the liftgate can only
be used ...
 Auto Lock/Unlock Function
WARNING
Do not pull the inner handle on a front
door:
Pulling the inner handle on a front
door while the vehicle is moving
is dangerous. Passengers can fall
out of the vehicle ...
Other materials:
Steering Shaft Inspection
1. Inspect the column bearing for excessive play and damage.
2. Verify that the measurement of the steering shaft indicated in the figure
is as specified.
If not within the specification replace the steering shaft component.
Steering shaft length
315—320 mm {12.41—12.59 ...
Radio Reception
AM characteristics
AM signals bend around such things as
buildings or mountains and bounce off the
ionosphere.
Therefore, they can reach longer distances
than FM signals.
Because of this, two stations may
sometimes be picked up on the same
frequency at the same time.
FM characterist ...
How to Arm the System
Close the windows and the moonroof *
securely.
Switch the ignition OFF.
Make sure the hood, the doors, and the
liftgate/trunk lid are closed.
Press the lock button on the transmitter
or lock the driver's door from the
outside with the auxiliary key.
The hazard warning lights will ...
