
Mazda 3 Service Manual: M Position Switch Inspection [Fw6 A EL]
Continuity Inspection
NOTE:
-
The M position switch is built into the selector lever component.
1. Remove the battery cover..
2. Disconnect the negative battery cable..
3. Remove the console..
4. Disconnect the selector lever component connector.
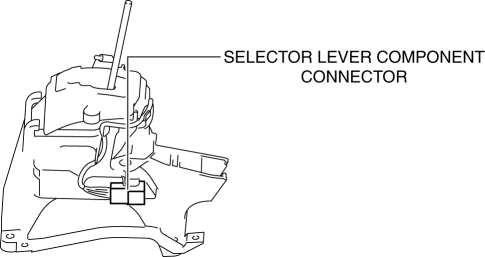
5. Verify that the continuity between selector lever component terminals A and H.
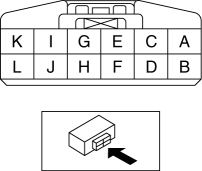
-
If not as verified, replace the selector lever component..
|
Test condition |
Continuity |
|
Selector lever is in the M position. |
Continuity |
|
Selector lever is not in the M position. |
No continuity |
 M Position Switch Inspection [FS5 A EL]
1. Perform the following procedures.
a. Remove the battery cover..
b. Disconnect the negative battery cable.
c. Remove the console..
d. Disconnect the selector lever component connector.
...
 Neutral Switch Removal/Installation [A26 M R]
1. Disconnect the negative battery cable.
2. Disconnect the neutral switch connector.
3. Remove the aerodynamic under cover No.2..
4. Remove the neutral switch with the gasket.
5. Install ...
Other materials:
Automatic Transaxle Removal/Installation [FS5 A EL]
CAUTION:
Secure the steering wheel using tape or a cable to prevent the steering shaft
from rotating after disconnecting the steering shaft. If the steering wheel
rotates after the steering shaft and the steering gear and linkage are disconnected,
the internal parts of the clock spr ...
Tire Rotation
To equalize tread wear, rotate the tires every 12,000 km (7,500 miles) at the
latest or sooner
if irregular wear develops. Mazda recommends to rotate every 8,000 km (5,000
miles) to
help increase tire life and distribute wear more evenly.
Inspect the tires for uneven wear and damage. Abno ...
Engine Exhaust (Carbon monoxide)
WARNING
Do not drive your vehicle if you smell exhaust gas inside the
vehicle:
Engine exhaust gas is dangerous. This gas contains carbon monoxide (CO),
which is
colorless, odorless, and poisonous. When inhaled, it can cause loss of
consciousness and
death. If you smell ...
