Mazda 3 Service Manual: Neutral Switch Removal/Installation [A26 M R]
1. Disconnect the negative battery cable.
2. Disconnect the neutral switch connector.
3. Remove the aerodynamic under cover No.2..
4. Remove the neutral switch with the gasket.
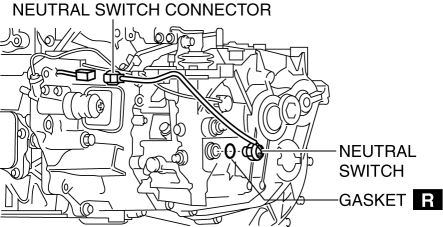
5. Install a new gasket and the neutral switch to the transaxle case.
-
Tightening torque
-
29—39 N·m {3.0—3.9 kgf·m, 22—28 ft·lbf}
6. Install the aerodynamic under cover No.2..
7. Connect the neutral switch connector.
8. Connect the negative battery cable.
 M Position Switch Inspection [Fw6 A EL]
Continuity Inspection
NOTE:
The M position switch is built into the selector lever component.
1. Remove the battery cover..
2. Disconnect the negative battery cable..
3. Remove the ...
 Neutral Switch Removal/Installation [C66 M R]
1. Remove the battery cover..
2. Disconnect the negative battery cable..
3. Remove the aerodynamic under cover No.2..
4. Install in the reverse order of removal.
5. Remove in the order indicat ...
Other materials:
Oil Pan Removal/Installation [Mzr 2.0, Mzr 2.5]
WARNING:
Hot engines and engine oil can cause severe burns. Turn off the engine and
wait until it and the engine oil have cooled.
A vehicle that is lifted but not securely supported on safety stands is dangerous.
It can slip or fall, causing death or serious injury. Never work ...
Push-Starting
Do not push-start your Mazda.
WARNING
Never tow a vehicle to start it:
Towing a vehicle to start it is
dangerous. The vehicle being towed
could surge forward when its engine
starts, causing the two vehicles to
collide. The occupants could be injured.
CAUTION
...
Rear Bumper Disassembly/Assembly
1. Remove the License plate lights..
2. Disassemble in the order indicated in the table.
1
Fastener A
2
Bracket
3
Screw B
4
Reflector
(See Reflector Removal Note)
5 ...
