Mazda 3 Service Manual: Oil Seal (Differential) Replacement [C66 M R]
1. Remove the aerodynamic under cover No.2 and the splash shield as a single unit..
2. Drain the manual transaxle oil..
3. Disconnect the drive shaft (LH) from the MTX..
4. Disconnect the drive shaft (RH) from the joint shaft..
5. Remove the joint shaft..
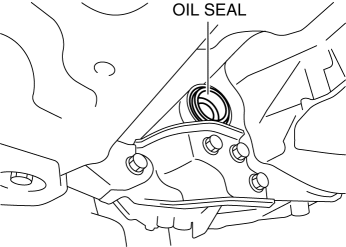
6. Remove the oil seal (LH).
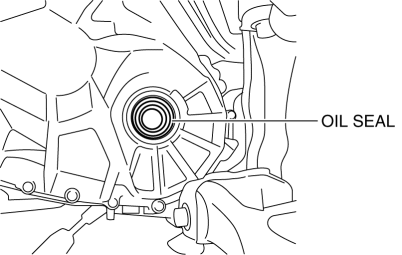
7. Remove the oil seal (RH).
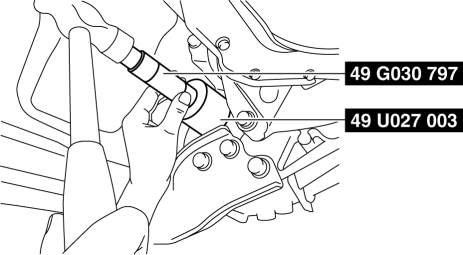
8. Using the SST
s and a hammer, tap each a new oil seal (LH) in evenly until the SST
s contacts the transaxle case.
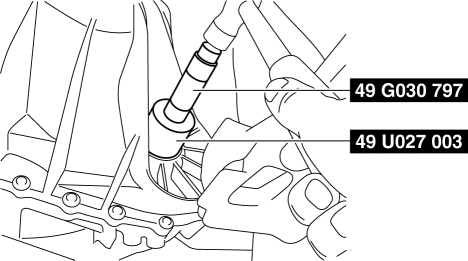
9. Using the SST
s and a hammer, tap each a new oil seal (RH) in evenly until the SST
s contacts the transaxle case.
10. Coat the lip of each oil seal with transaxle oil.
11. Install in the reverse order of removal.
12. Add the specified amount of specified transaxle oil..
 Oil Seal (Differential) Replacement [A26 M R]
1. On level ground, jack up the vehicle and support it evenly on safety stands.
2. Drain the oil from the transaxle..
3. Remove the front tires..
4. Remove the splash shield..
5. Remove the a ...
 Oil Seal (Differential) Replacement [Fw6 A EL]
1. Remove the aerodynamic under cover No.2 and the splash shield as a single
unit..
2. Remove the oil seal.
a. Drain the ATF..
b. Disconnect the drive shaft (LH) from the transaxle..
c. Disc ...
Other materials:
General Procedures (Steering)
Wheel and Tire Installation
1. When installing the wheels and tires, tighten the wheel nuts in a criss-cross
pattern to the following tightening torque.
Tightening torque
88—118 N·m {9.0—12 kgf·m, 65—87 ft·lbf}
Connector Disconnection
1. Disconnect the negative batte ...
Disc Pad (Front) Replacement [Mzr 2.0, Skyactiv G 2.0, Mzr 2.5]
1. Remove in the order indicated in the table.
2. Install in the reverse order of removal.
3. After installation, pump the brake pedal a few times and verify that the brakes
do not drag.
1
Clip
2
Retaining clip
(See FRONT BRAKE (DISC ...
Transaxle Oil Inspection [A26 M R]
1. Park the vehicle on level ground.
2. Remove the aerodynamic under cover No.2..
3. Remove the oil level plug and gasket.
4. Verify that the oil is near the brim of the plug port.
If the oil level is lower than the low level, add the specified amount and
type of oil through the ...
