Mazda 3 Service Manual: Rear Buckle Removal/Installation
Rear Buckle (RH) and Rear Buckle (Center)
1. Remove the rear seat cushion..
2. Remove the bolt.
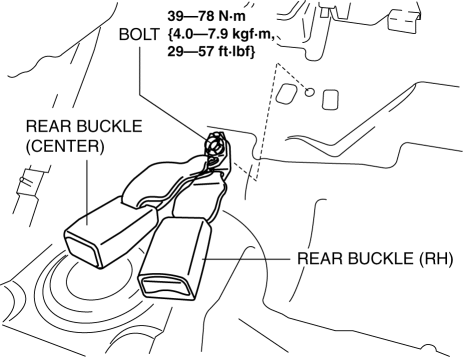
3. Remove the rear buckle (RH) and rear buckle (center).
4. Install in the reverse order of removal.
Rear Buckle (LH)
1. When removing or installing the rear buckle (LH), refer to the rear center seat belt removal/installation procedure..
Rear Buckle Installation Note
-
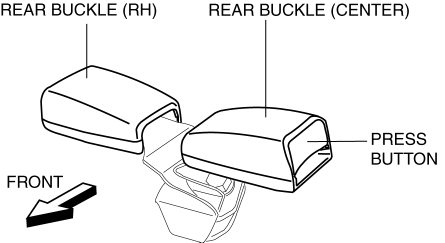
After installing the rear seat cushion, position the rear buckle (RH) and rear buckle (center) with the rear buckle (RH) and rear buckle (center) buttons facing upward as shown in the figure.
 Front Seat Belt Removal/Installation [Two Step Deployment Control System]
WARNING:
Handling the front seat belt (pre-tensioner seat belt) improperly can accidentally
deploy the pre-tensioner seat belt, which may seriously injure you. Read the
air bag system ...
 Rear Seat Belt Removal/Installation
CAUTION:
The ELR (emergency locking retractor) has a spring that will unwind if the
retractor cover is removed. The spring cannot be rewound by hand. If this occurs,
the ELR will not w ...
Other materials:
Vehicle Speed Sensor (VSS) Removal/Installation [FS5 A EL]
CAUTION:
If foreign materials are stuck to the sensor, disturbance by magnetic flux
can cause sensor output to be abnormal and thereby negatively affect control.
Make sure that foreign materials such as iron filings are not stuck to the sensor
during installation.
1. Perform t ...
Air conditioning filter
To ensure optimal performance of the climate control system in your
Subaru Solterra, the air conditioning filter must be inspected and replaced at regular
intervals.
A clean air conditioning filter in the Subaru Solterra not only improves
airflow efficiency but also enhances cabin air quality ...
Glass Antenna
Purpose, Function
4SD
The AM/FM radio waves and RDS-TMC (Radio Data System-Traffic Message Channel)
radio waves are converted to an electrical signal and the signal is sent to
the audio unit.
5HB (With audio unit (with display))
The RDS-TCM (Radio Data System-Traffic Mes ...
