Mazda 3 Service Manual: Rear Seat Belt Removal/Installation
CAUTION:
-
The ELR (emergency locking retractor) has a spring that will unwind if the retractor cover is removed. The spring cannot be rewound by hand. If this occurs, the ELR will not work properly. Therefore, do not disassemble the retractor.
4SD
1. Remove the following parts:
a. Rear scuff plate.
b. Rear seat cushion.
c. Rear seat back.
d. Tire house trim.
e. C-pillar trim..
f. Rear package trim..
2. Remove the bolts.
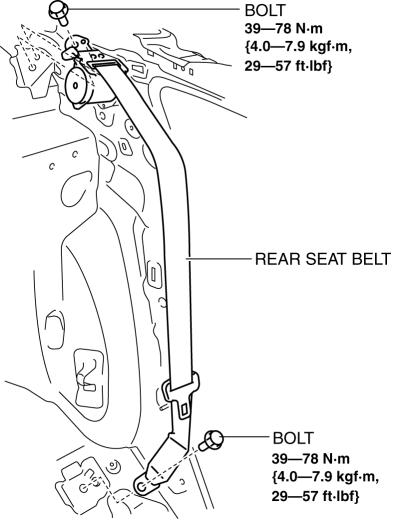
3. Remove the rear seat belt.
4. Install in the reverse order of removal.
5HB
1. Remove the following parts:
a. Rear scuff plate.
b. Rear seat cushion.
c. Rear seat back.
d. Tire house trim.
e. Trunk side upper trim..
f. C-pillar trim..
2. Remove the bolts.
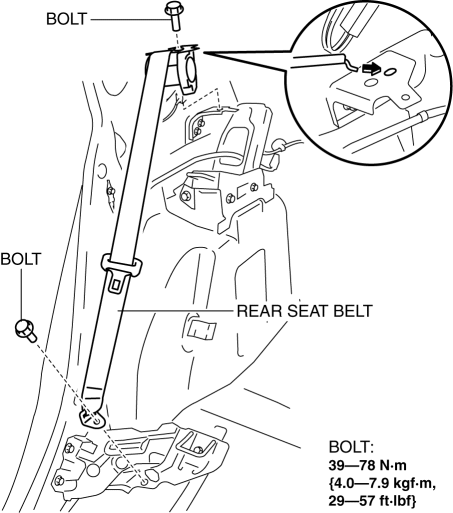
3. Remove the rear seat belt.
4. Install in the reverse order of removal.
 Rear Buckle Removal/Installation
Rear Buckle (RH) and Rear Buckle (Center)
1. Remove the rear seat cushion..
2. Remove the bolt.
3. Remove the rear buckle (RH) and rear buckle (center).
4. Install in the reverse order of ...
 Seat Belt Inspection
Belt
1. Verify that the belt is installed properly with no twists or kinks.
2. Verify that there is no damage to the seat belt and no deformation of the
metal fittings.
If there is any ...
Other materials:
Front Fender Panel Removal/Installation
1. Disconnect the negative battery cable..
2. Remove the following parts:
a. Front bumper.
b. Front combination light.
c. Front fender molding.
d. Side step molding.
3. Remove fasteners and bolts, then remove the front fender panel in the direction
of the arrow shown in the figure.
...
Schedule 2
Chart symbols:
I: Inspect: Inspect and clean, repair, adjust, fill up, or replace if
necessary.
R: Replace
L : Lubricate
C: Clean
T: Tighten
Remarks:
*1 Use of FL-22 is recommended when replacing engine coolant. Using engine
coolant other than FL-22 may
cause serious damage to the en ...
Control System Personalization Features Setting Procedure
1. Connect the M-MDS to the DLC-2.
2. After the vehicle is identified, select the following items from the initial
screen of the M-MDS.
When using the IDS (laptop PC)
Select the “Module Programming”.
Select the “Programmable Parameters”.
3 ...
