Mazda 3 Owners Manual: Replacing a Tire
| WARNING
Always use tires that are in good
condition:
Driving with worn tires is dangerous. Reduced braking, steering, and traction could result in an accident. Replace all four tires at the same time: Replacing just one tire is dangerous. It could cause poor handling and poor braking resulting in loss of vehicle control. Mazda strongly recommends that you replace all four tires at the same time. |
If a tire wears evenly, a wear indicator will appear as a solid band across the tread.
Replace the tire when this happens.
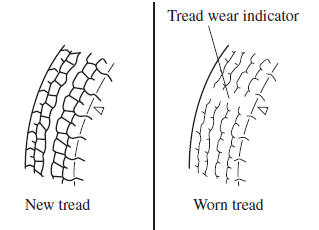
You should replace the tire before the band crosses the entire tread.
(With tire pressure monitoring system)
After adjusting the tire pressure, initialization of the tire pressure monitoring system is necessary to make the system operate normally.
Refer to Tire Pressure Monitoring System Initialization on .
NOTE Tires degrade over time, even when they are not being used on the road. It is recommended that tires generally be replaced when they are 6 years or older.
Heat caused by hot climates or frequent high loading conditions can accelerate the aging process. You should replace the spare tire when you replace the other road tires due to the aging of the spare tire. The period in which the tire was manufactured (both week and year) is indicated by a 4-digit number.
Refer to Tire Labeling on .
 Tire Rotation
WARNING
Rotate tires periodically:
Irregular tire wear is dangerous. To
equalize tread wear for maintaining
good performance in handling and
braking, rotate the tires every 12,00 ...
 Temporary Spare Tire
Inspect the temporary spare tire at least
monthly to make sure it is properly
inflated and stored.
NOTE
The temporary spare tire condition
gradually deteriorates even if it has not
been used.
T ...
Other materials:
How To Use This Manual
Range of Topics
This manual contains procedures for performing all required service operations.
The procedures are divided into the following five basic operations:
Removal/Installation
Disassembly/Assembly
Replacement
Inspection
Adj ...
Rear Shock Absorber Disposal
1. Clamp a rear shock absorber on a flat surface or with the piston pointing
downwards.
2. Drill a 2—3 mm {0.08—0.11 in} hole at a point 40—50 mm {1.6—1.9
in} from the bottom of the tube, so that the gas can escape.
WARNING:
Whenever drilling into a rear shock absorber, w ...
No.6 Bsm Indicator Light Flashes While Not Under Bsm Indicator Light Flashing
Conditions (No Combination Switch Operation (Turn Signal Switch)) [Blind Spot Monitoring
(Bsm)]
6
BSM indicator light flashes while not under BSM indicator light-flashing
conditions (no combination switch operation (turn signal switch)
Description
The BSM indicator light flashes despite not satisfying the BSM indicator
l ...
