Mazda 3 Owners Manual: Replacing Rear Window Wiper Blade (5-Door)
When the wiper no longer cleans well, the blade is probably worn or cracked.
Replace it.
| CAUTION To prevent damage to the wiper arm and other components, do not move the wiper by hand. |
- Remove the cover
- ( With stopper type)
Remove the stopper and raise the wiper
arm.
(Without stopper type)
Raise the wiper arm.
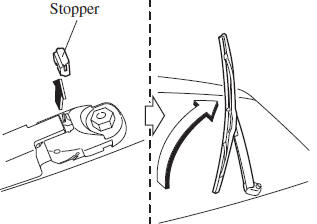
- Firmly rotate the wiper blade to the right until it unlocks, then remove the blade.
| CAUTION To prevent damage to the rear window, do not let the wiper arm fall on it. |
- Pull down the blade rubber and slide it out of the blade holder.
- Remove the metal stiffeners from the blade rubber and install them in the new blade.
| CAUTION
Do not bend or discard the stiff eners. You need to use them again. |
- Carefully insert the new blade rubber.
Then install the blade assembly in the reverse order of removal.
 Replacing Windshield Wiper Blades
When the wipers no longer clean well, the
blades are probably worn or cracked.
Replace them.
CAUTION
To prevent damage to the wiper arms
and other components, do not try to
sweep ...
 Battery
WARNING
Wash hands after handling the battery and related accessories:
Battery posts, terminals and related accessories contain lead and lead
compounds,
chemicals known to the Stat ...
Other materials:
HVAC SST
49 B061 014
Spring Lock Coupling Disconnect Tool
49 G061 001
Spring Lock Coupling Disconnect Tool
49 B061 015A
Holder
49 0839 425C
Bearing puller set
49 SE01 160 ...
Antenna Feeder No.1 Inspection
1. Disconnect the negative battery cable..
2. Remove the following parts:
a. Center panel.
b. Audio unit.
c. A-pillar trim (RH).
3. Disconnect antenna feeder No.2.
4. Verify that the continuity between antenna feeder No.1 terminals is as indicated
in the table.
If not a ...
Rear Shock Absorber Disposal
1. Clamp a rear shock absorber on a flat surface or with the piston pointing
downwards.
2. Drill a 2—3 mm {0.08—0.11 in} hole at a point 40—50 mm {1.6—1.9
in} from the bottom of the tube, so that the gas can escape.
WARNING:
Whenever drilling into a rear shock absorber, wear prot ...
