Mazda 3 Service Manual: Front Seat Belt Removal/Installation [Two Step Deployment Control System]
WARNING:
-
Handling the front seat belt (pre-tensioner seat belt) improperly can accidentally deploy the pre-tensioner seat belt, which may seriously injure you. Read the air bag system service warnings and cautions before handling the front seat belt..
WARNING:
-
The side air bag sensor is attached to the lower part of the B-pillar. When working around the B-pillar, disconnect the negative battery cable avoiding excessive impact to the lower part of the B-pillar.
CAUTION:
-
The ELR (emergency locking retractor) has a spring that will unwind if the retractor cover is removed. The spring cannot be rewound by hand. If this occurs, the ELR will not work properly. Therefore, do not disassemble the retractor.
Driver-side
1. Switch the ignition to off.
2. Disconnect the negative battery cable and wait for 1min or more
..
3. Remove the front scuff plate..
4. Remove the rear scuff plate..
5. Remove the B-pillar lower trim..
6. Remove the fastener.
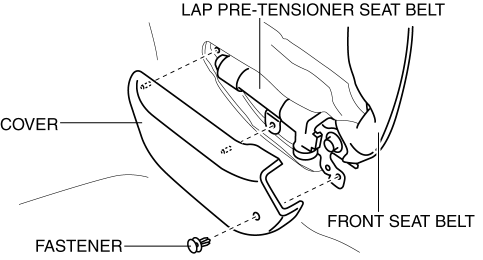
7. Remove the cover.
8. Remove the bolt A.
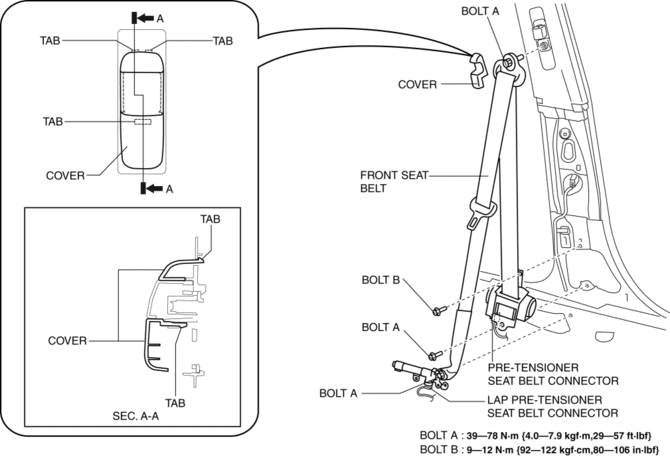
9. Remove the bolt B.
10. Remove the front seat belt.
11. Using a flathead screwdriver, lift the locking device carefully, however do not remove it.
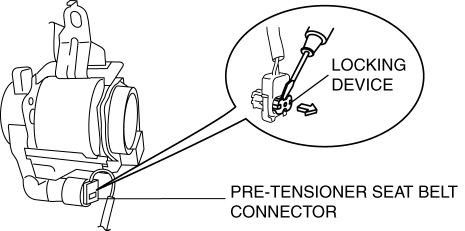
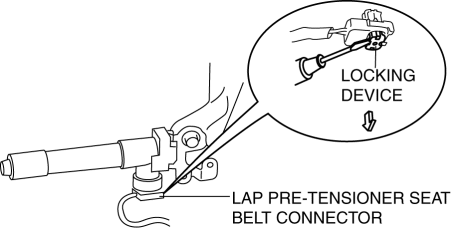
12. Disconnect the pre-tensioner seat belt connector.
13. Disconnect the lap pre-tensioner seat belt connector.
14. Install in the reverse order of removal.
15. Switch the ignition to ON.
16. Verify that the air bag system warning light illuminates for approx. 6 s
and goes out.
-
If the air bag system warning light does not operate, refer to the on-board diagnostic system (air bag system) and perform inspection of the system..
Passenger-side
1. Switch the ignition to off.
2. Disconnect the negative battery cable and wait for 1min or more
..
3. Remove the front scuff plate..
4. Remove the rear scuff plate..
5. Remove the B-pillar lower trim..
6. Remove the cover.
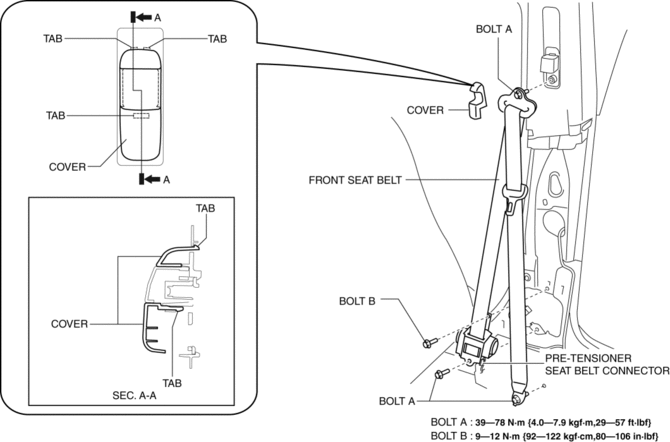
7. Remove the bolt A.
8. Remove the bolt B.
9. Remove the front seat belt.
10. Using a flathead screwdriver, lift the locking device carefully, however do not remove it.

11. Disconnect the pre-tensioner seat belt connector.
12. Install in the reverse order of removal.
13. Switch the ignition to ON.
14. Verify that the air bag system warning light illuminates for approx. 6 s
and goes out.
-
If the air bag system warning light does not operate, refer to the on-board diagnostic system (air bag system) and perform inspection of the system..
 Front Seat Belt Removal/Installation [Standard Deployment Control System]
WARNING:
Handling the front seat belt (pre-tensioner seat belt) improperly can accidentally
deploy the pre-tensioner seat belt, which may seriously injure you. Read the
air bag system se ...
 Ion Sensor Inspection [Skyactiv G 2.0]
DTC Inspection
NOTE:
Because the ion sensor is integrated in the ignition coil, replacing the
ion sensor includes replacement of the ignition coil/ion sensor.
1. Connect the M-MDS to ...
Other materials:
Transaxle Oil Inspection [G66 M R]
1. Park the vehicle on level ground.
2. Remove the aerodynamic under cover No.2..
3. Remove the oil level plug and washer.
4. Verify that the oil is near the brim of the plug port.
If the oil level is lower than the low level, add the specified amount and
type of oil through the ...
Steering Wheel And Column Removal/Installation [With Advanced Keyless Entry
And Push Button Start System]
WARNING:
Handling the air bag module improperly can accidentally operate (deploy)
the air bag module, which may seriously injure you. Read the service warnings
before handling the air bag module..
1. Remove the driver-side front scuff plate..
2. Remove the driver-side front sid ...
Advanced Keyless Entry
WARNING
Radio waves from the key may aff ect
medical devices such as pacemakers:
Before using the key near people who
use medical devices, ask the medical
device manufacturer or your physician
if radio waves from the key will aff ect
the device.
The advanced keyless ...
