Mazda 3 Owners Manual: Seat Operation
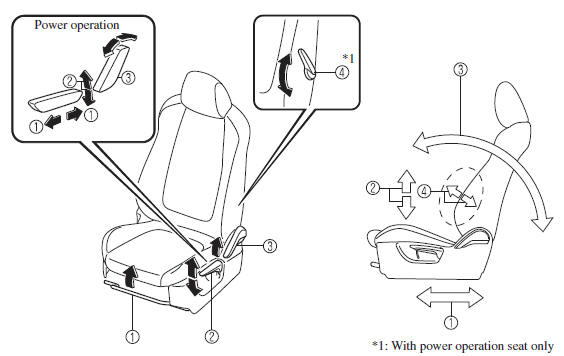
*1: With power operation seat only
1. Seat Slide
(Manual Seat)
To move a seat forward or backward, raise the lever and slide the seat to the
desired position
and release the lever.
Make sure the lever returns to its original position and the seat is locked in place by attempting to push it forward and backward.
(Power Seat)
To slide the seat, move the slide lifter switch on the outside of the seat to
the front or back
and hold it. Release the switch at the desired position.
2. Height Adjustment (Driver's Seat)
(Manual Seat)
To adjust the seat height, move the lever up or down.
(Power Seat)
To adjust the seat height, move the switch up or down.
3. Seat Recline
(Manual Seat)
To change the seatback angle, lean forward slightly while raising the lever.
Then lean back
to the desired position and release the lever.
Make sure the lever returns to its original position and the seatback is locked in place by attempting to push it forward and backward.
(Power Seat)
To change the seatback angle, press the front or rear side of the reclining
switch. Release the
switch at the desired position.
4. Lumbar Support Adjustment (Driver's Seat) *
To increase the seat firmness, move the lever downward. Move the lever upward to decrease firmness.
 Front Seat
...
 Seat Warmer
The front seats are electrically heated. The
ignition must be switched ON.
Press the seat warmer switch to illuminate
the indicator light while the ignition
is switched ON. The mode changes as
...
Other materials:
Solenoid Valve Inspection [FS5 A EL]
CAUTION:
Water or foreign objects entering the connector can cause a poor connection
or corrosion. Be sure not to drop water or foreign objects on the connector
when disconnecting it.
Primary Control Valve Body
On-vehicle inspection
1. Perform the following procedures.
a. Rem ...
Power Window System Preliminary Inspection [Power Window System]
Manual Open/close Function Inspection
STEP
INSPECTION
ACTION
1
Switch the ignition to ON.
Operate the power window using the manual open/close function on
the power window main switch.
...
Manifold Absolute Pressure (Map) Sensor/Boost Air Temperature Sensor Removal/Installation
[Mzr 2.3 Disi Turbo]
NOTE:
Because the boost air temperature sensor is integrated in the MAP sensor,
replacing the boost air temperature sensor includes replacement of the MAP sensor/boost
air temperature sensor.
1. Remove the battery cover..
2. Disconnect the negative battery cable..
3. Remove t ...
