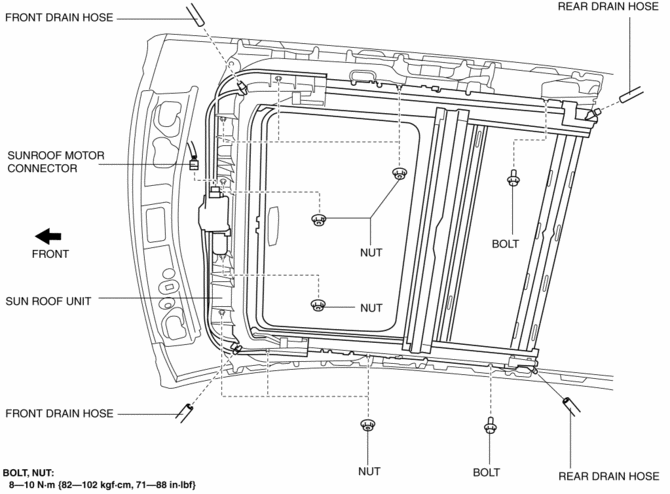
Mazda 3 Service Manual: Sunroof Unit Removal/Installation
CAUTION:
-
If the sunshade is forced close while the sunroof is open, the sunshade could be damaged.
1. Disconnect the negative battery cable..
2. Remove the rain sensor cover. (Vehicles with auto light/wiper system).
3. Disconnect the rain sensor connector. (Vehicles with auto light/wiper system)
4. Partially peel back the seaming welts.
5. Remove the following parts:
a. Sunroof seaming welt
b. A–pillar trim.
c. Front scuff plate.
d. Rear scuff plate.
e. B-pillar lower trim.
f. Upper anchor of the front seat belt.
g. B-pillar upper trim.
h. Rear seat cushion.
i. Tire house trim.
j. Trunk side upper trim (5HB).
k. C–pillar trim.
l. Map light.
m. Sunvisor.
n. Assist handle.
o. Headliner.
6. Disconnect the front and rear drain hose from the sunroof frame.
7. Disconnect the sunroof motor connector.
8. Remove the bolts.

9. Remove the nuts, and then remove the sunroof unit.
10. Install in the reverse order of removal.
11. Adjust the glass panel..
 Sunroof Unit Disassembly/Assembly
NOTE:
If the guide or sunroof motor is removed, the glass panel will not be positioned
properly after the re-installation. To ensure proper positioning of the glass
panel, place alignmen ...
 Sunroof Switch Inspection
NOTE:
The sunroof switch is together with the front map light.
1. Disconnect the negative battery cable..
2. Remove the map light from the headliner..
3. Inspect for continuity betwe ...
Other materials:
Door Sash Film Installation
1. Remove any grease or dirt from the affixing surface of the door.
2. Cut away the unused portion along the dotted lines.
3. Peel off the backing paper and attach the door sash film onto the door as
shown in the figure.
Standard clearance
a: 3.0—5.0 mm {0.12—0.19 in}
...
Mass Air Flow (MAF) Sensor/Intake Air Temperature (Iat) Sensor No.1 Removal/Installation
[Skyactiv G 2.0]
CAUTION:
Be careful not to hit the sensor element or allow foreign matter to get on
it during sensor removal/installation. If the sensor element is hit or foreign
matter gets on it, an error may occur in the sensor output signal resulting
in deterioration in the engine control.
...
High Mount Brake Light Bulb Removal/Installation
4SD
1. Disconnect the negative battery cable..
2. Remove the trunk lid trim..
3. Remove in the order indicated in the table.
1
Connector
2
Socket
3
High-mount brake light bulb
4. Install in the rev ...
