Mazda 3 Service Manual: Thermostat Removal/Installation [Mzr 2.0, Mzr 2.5]
WARNING:
-
Never remove the cooling system cap or loosen the radiator drain plug while the engine is running, or when the engine and radiator are hot. Scalding engine coolant and steam may shoot out and cause serious injury. It may also damage the engine and cooling system.
-
Turn off the engine and wait until it is cool. Even then, be very careful when removing the cap. Wrap a thick cloth around it and slowly turn it counterclockwise 2.5 turns. Step back while the pressure escapes.
-
When you are sure all the pressure is gone, turn the cap using the cloth, and remove it.
1. Remove the battery cover..
2. Disconnect the negative battery cable..
3. Remove the plug hole plate..
4. Remove the aerodynamic under cover No.2 and splash shield as a single unit..
5. Drain the engine coolant..
6. Remove the generator drive belt with the A/C drive belt still installed and set it out of the way. (MZR 2.0).
7. Remove the drive belt. (MZR 2.5).
8. Remove the drive belt auto tensioner. (MZR 2.0).
9. Remove the idler pulley. (MZR 2.5).
10. Remove in the order indicated in the table.
11. Install in the reverse order of removal.
12. Refill the engine coolant..
13. Inspect for engine coolant leakage..
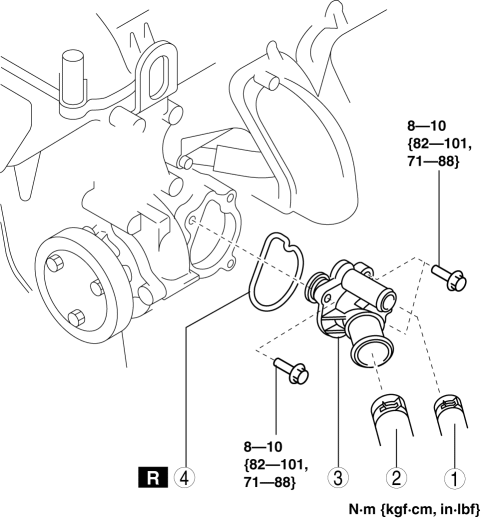
|
1 |
Water hose |
|
2 |
Lower radiator hose |
|
3 |
Thermostat component |
|
4 |
Gasket |
 Thermostat Inspection [Mzr 2.0, Mzr 2.5]
1. Remove the thermostat..
2. Visually check that the thermostat valve is closed.
3. Place the thermostat in water.
WARNING:
During inspection, the thermostat and water are extremely hot ...
 Emissions
...
Other materials:
ALL AUTO (ECO) control
In the Subaru Solterra, the ALL AUTO (ECO) control intelligently
manages interior comfort by automatically adjusting seat heaters/radiant heaters*,
seat ventilators*, and the heated steering wheel* based on the selected climate
settings, as well as real-time cabin and outside temperature condi ...
Clock Spring Inspection [Standard Deployment Control System]
1. Disconnect the negative battery cable..
2. Remove the driver–side air bag module..
3. Remove the steering wheel..
4. Remove the column cover.
5. Remove the clock spring..
6. Verify that the continuity is as indicated in the table.
If not as indicated in the table, replace the ...
If You Must Use the Front Seat for
Children
If you cannot put all children in the rear
seat, at least put the smallest children
in the rear and be sure the largest child
up front uses the shoulder belt over the
shoulder.
NEVER put a rear-facing child-restraint
system on the front passenger seat whether
your vehicle is equipped with a ...
