Mazda 3 Service Manual: Transaxle Oil Replacement [A26 M R]
1. Park the vehicle on level ground.
2. Remove the aerodynamic under cover No.2..
3. Remove the drain plug and gasket.
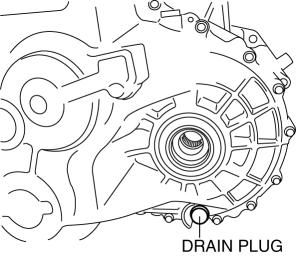
4. Drain the oil into a suitable container.
5. Install a new gasket and the drain plug.
-
Tightening torque
-
28—51 N·m {2.9—5.2 kgf·m, 21—37 ft·lbf}
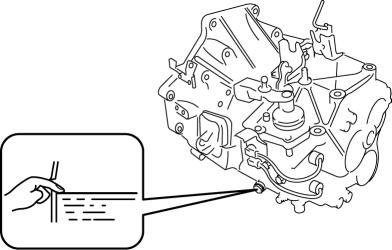
6. Remove the oil level plug and gasket.
7. Add the specified amount and type of oil through the oil level plug hole until the level reaches the bottom of the oil level plug hole.
Manual transaxle oil
|
Item |
Specification |
|
Grade |
API service GL-4 |
|
Viscosity |
SAE 75W-80 |
|
Capacity (approx. quantity) |
2.4—2.6 L {2.6—2.7 US qt, 2.12—2.28 lmp qt} |
8. Install a new gasket and the oil level plug.
-
Tightening torque
-
28—51 N·m {2.9—5.2 kgf·m, 21—37 ft·lbf}
9. Install the aerodynamic under cover No.2..
 Transaxle Oil Inspection [G66 M R]
1. Park the vehicle on level ground.
2. Remove the aerodynamic under cover No.2..
3. Remove the oil level plug and washer.
4. Verify that the oil is near the brim of the plug port.
I ...
 Transaxle Oil Replacement [G35 M R]
1. Park the vehicle on level ground.
2. Remove the aerodynamic under cover No.2..
3. Remove the drain plug and washer.
4. Drain the oil into a suitable container.
5. Install a new washer a ...
Other materials:
Available Language (Type A)
The available languages are English,
Spanish, and Canadian French. If the
language setting is changed, all of the
voice guidance and voice input commands
are done in the selected language.
NOTE
If the language setting is changed,
device registration is maintained.
Phonebook records are ...
Operating the Compact Disc (CD) Player
Type
Playable data
Music/MP3/WMA/
AAC CD player
Music data (CD-DA)
MP3/WMA/AAC file
NOTE
If a disc has both music data (CD-DA)
and MP3/WMA/AAC files, playback of the
two or three file types differs depending on
how the disc was reco ...
Locking, Unlocking with Request
Switch (With the advanced keyless
function)
All doors and the liftgate can be locked/
unlocked by pressing the request switch
on the front doors while the key is being
carried.
(5–door)
The request switch on the liftgate can only
be used to lock all doors and the liftgate.
Front doors
Liftgate (5-door Lock only)
To lock
To ...
