Mazda 3 Service Manual: Variable Intake Air Shutter Valve Actuator Inspection [Mzr 2.0, Mzr 2.5]
Operation Inspection
1. Remove the air hose..
2. Disconnect the vacuum hose from the variable intake air shutter valve actuator.
3. Connect a vacuum pump to the variable intake air shutter valve actuator.
NOTE:
-
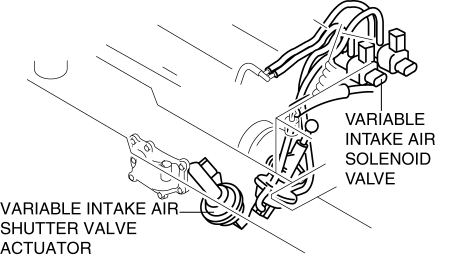
Covered with a hood, the rod of the variable intake air shutter valve actuator cannot be seen from above. Use a mirror from under it to check the operation of the variable intake air shutter valve.
4. Check if the rod operates correctly as stated in the table when a gradual
negative pressure is applied to the variable intake air shutter valve actuator.
|
Vacuum kPa {mmHg, inHg} |
Rod movement |
|
Below –2.7 {–20, –0.8} |
Not operate |
|
Above –33.4 {–251, –9.86} |
Fully pulled |
-
When it is not possible to confirm it, replace the intake manifold..
-
When the variable intake air shutter valve actuator cannot be activated even though the operation of the rod can be confirmed, check for any incorrect connections or breakage of the vacuum hose.
 Intake Manifold Vacuum Inspection [Mzr 2.0, Mzr 2.5]
1. Disconnect the evaporative hose (purge solenoid valve side) and install the
vacuum gauge..
2. Verify that the intake air hoses are installed securely.
3. Warm up the engine.
4. Measure the ...
 Variable Intake Air Solenoid Valve Inspection [Mzr 2.0, Mzr 2.5]
Airflow Inspection
1. Remove the battery cover..
2. Disconnect the negative battery cable..
3. Remove the variable intake air solenoid valve..
4. Inspect airflow between the ports under the fol ...
Other materials:
Solenoid Valve Removal/Installation [FS5 A EL]
WARNING:
A hot transaxle and ATF can cause severe burns. Turn off the engine and wait
until they are cool.
Primary Control Valve Body
1. Remove the primary control valve body.
a. Remove the battery cover..
b. Disconnect the negative battery cable.
c. Remove the aerodynamic un ...
Fuel Economy Monitor
For vehicles with type B audio, the Control Status and Fuel Consumption are
switched and
displayed by operating each icon in the display.
In addition, after completing a trip, the total energy efficiency to date is
displayed in the
ending display when the ending display is turned on.
Se ...
Auxiliary Jack Removal/Installation
1. Disconnect the negative battery cable..
2. Remove the following parts:
a. Upper panel.
b. Shift lever knob (MTX).
c. Selector lever knob (ATX).
d. Shift panel.
e. Side wall.
f. Console.
3. Remove the auxiliary jack in the direction of the arrow (2) shown in the figure
while pres ...
