Mazda 3 Service Manual: Windshield Removal
1. Disconnect the negative battery cable.
2. Remove the following parts:
a. Windshield wiper arm and blade.
b. Cowl grille.
c. Rain sensor (Vehicles with auto light/wiper system).
d. Auto-dimming mirror (Vehicles with auto-dimming mirror).
e. Rear view mirror (Vehicles without auto-dimming mirror).
f. A-pillar trim.
g. Sunvisor.
h. Assist handle.
3. Set the headliner out of the way.
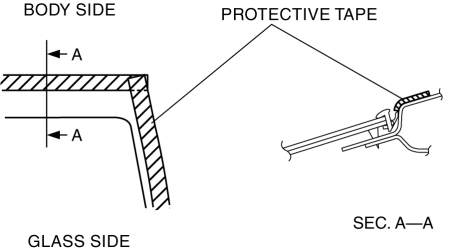
4. Apply protective tape along the edge of the body.

NOTE:
-
Overlap and adhere the protective tape to the corners to prevent damage.
5. Remove the windshield molding by pulling it outward.
NOTE:
-
If the windshield molding is difficult to remove, warm the windshield molding using a hot air blower.
-
The windshield molding is a replacement part.
Not Reusing Windshield
NOTE:
-
If it is difficult to cut sealant, use piano wire and follow the procedure under “Reusing Windshield”.
WARNING:
-
Using piano wire with bare hands can cause injury. Always wear gloves when using piano wire.
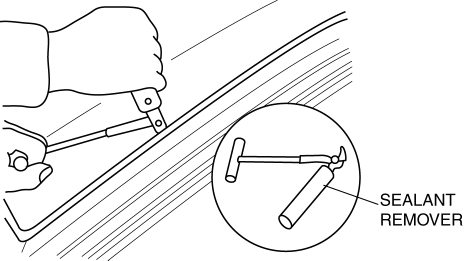
1. Cut out the sealant all around the glass using a sealant remover.

2. Remove the windshield.
Reusing Windshield
WARNING:
-
Using piano wire with bare hands can cause injury. Always wear gloves when using piano wire.
CAUTION:
-
Because the lens for rainfall/illumination level detection is integrated with the windshield, the auto wiper/auto light systems may not operate correctly if the lens is damaged. When removing the windshield, be careful not to damage the lens. If the lens is damaged, replace the windshield.
NOTE:
-
Before removing the windshield from the body, mark the position of the windshield by affixing tape to the windshield and body panel.
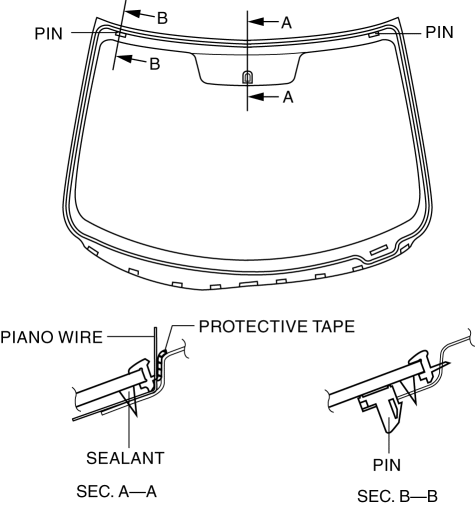
1. Avoiding the pin on the inside of the vehicle, insert piano wire which has been cut to sufficient length.

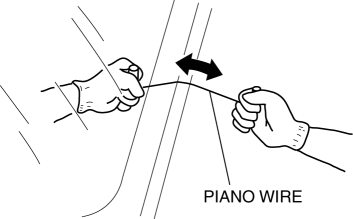
2. Wind each end of piano wire around a bar.
NOTE:
-
Use a long sawing action to spread the work over the whole length of piano wire to prevent it from breaking due to localized heating.
3. Secure one end of piano wire, and while pulling the other end, cut the sealant around the windshield.

4. Pinch the pin from the inside of the vehicle and detach it.
5. Remove the windshield.
6. If the pin is damaged, remove the pin.
NOTE:
-
Before removing the pin from the windshield glass, place an alignment mark on the windshield.
 Windshield Installation
WARNING:
Using a utility knife with bare hands can cause injury. Always wear gloves
when using a utility knife.
CAUTION:
If a door is opened or closed when all the window glas ...
 Horn
Horn
...
Other materials:
Overhead Lights
With Map Lights
Front
Rear
Without Map Lights
NOTE (With map lights) The rear overhead light also turn on and off when the front overhead light switch is operated.
Map Lights *
When the overhead light switch is in the door or off position, press the lens ...
Afs (Adaptive Front Lighting System) Off Switch Inspection
1. Disconnect the negative battery cable..
2. Remove the AFS OFF switch..
3. Verify that the continuity between the AFS OFF switch terminals is as indicated
in the table.
If the continuity is not as indicated in the table, replace the AFS OFF switch.
4. Apply battery po ...
Washer Tank Removal/Installation
Vehicles with the washer fluid-level sensor
1. Disconnect the negative battery cable..
2. Remove the front bumper..
3. Remove in the order indicated in the table.
1
Washer motor connector
2
Windshield washer hose
3
...
