
Mazda 3 Service Manual: Clock Spring Inspection [Two Step Deployment Control System]
1. Disconnect the negative battery cable..
2. Remove the driver–side air bag module..
3. Remove the steering wheel..
4. Remove the column cover.
5. Remove the clock spring..
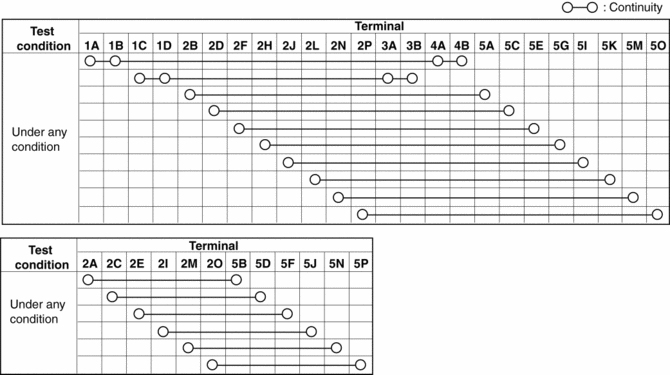
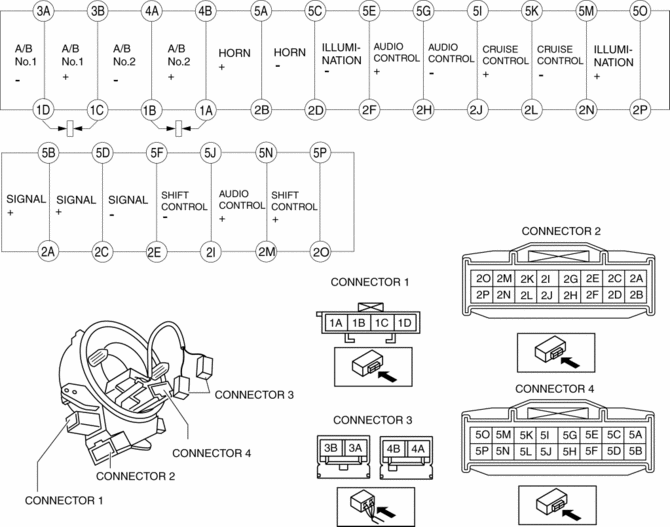
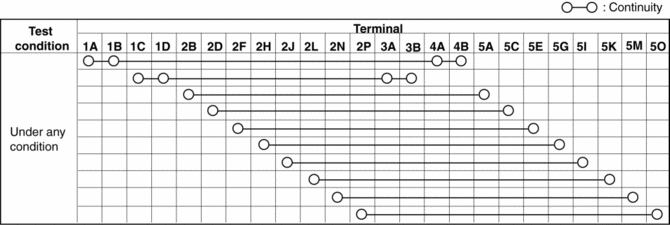
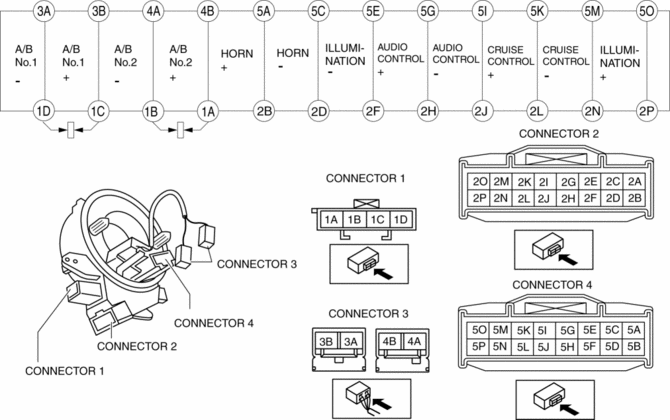
6. Verify that the continuity is as indicated in the table.
-
If not as indicated in the table, replace the clock spring.
NOTE:
-
When the vehicle-side connector for the clock spring is disconnected, terminals 1A, 1B, 1C and 1D are shorted to prevent unexpected operation (deployment) of the air bag module.
Vehicles with steering switch
Vehicles without steering switch
 Clock Spring Inspection [Standard Deployment Control System]
1. Disconnect the negative battery cable..
2. Remove the driver–side air bag module..
3. Remove the steering wheel..
4. Remove the column cover.
5. Remove the clock spring..
6. Verify that ...
 Clock Spring Removal/Installation
1. Disconnect the negative battery cable..
2. Remove the driver-side air bag module..
3. Remove the steering wheel..
4. Remove the column cover.
5. Remove the connectors.
6. Remove the t ...
Other materials:
Information Display Removal/Installation
CAUTION:
When replacing the information display, the configuration procedure must
be performed before removing the information display. The information display
will not operate normally if it is replaced without performing the configuration
procedure.
1. Perform the informatio ...
Manual Transaxle Removal/Installation [A26 M R]
CAUTION:
Secure the steering wheel using tape or a cable to prevent the steering shaft
from rotating after disconnecting the steering shaft. If the steering wheel
rotates after the steering shaft and the steering gear and linkage are disconnected,
the internal parts of the clock spr ...
Interior Light Bulb Removal/Installation
1. Disconnect the negative battery cable..
2. Insert a tape-wrapped fastener remover into the service hole and pry with
the screwdriver in the direction shown by the arrow to remove the lens.
3. Remove the interior light bulb.
4. Install in the reverse order of removal. ...
