Mazda 3 Service Manual: Windshield Wiper Motor Disassembly/Assembly
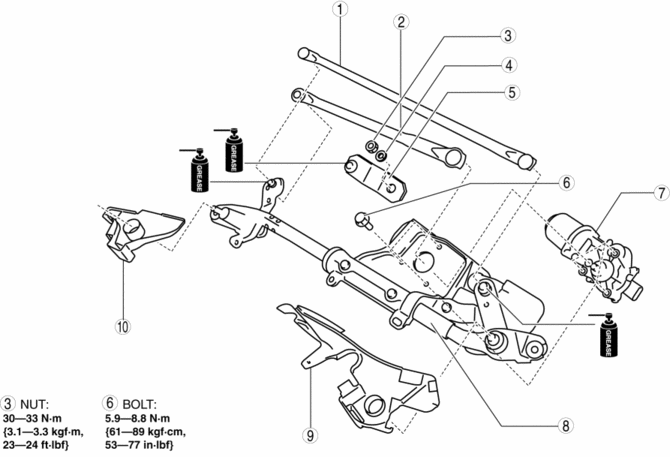
1. Disassemble in the order indicated in the table.
|
1 |
Wiper link No.1 (See Ball Joint Assembly Note.) |
|
2 |
Wiper link No.2 (See Ball Joint Assembly Note.) |
|
3 |
Nut |
|
4 |
Washer |
|
5 |
Crank arm |
|
6 |
Bolt |
|
7 |
Windshield wiper motor |
|
8 |
Main link (See Ball Joint Assembly Note.) |
|
9 |
Windshield wiper motor cover No.1 |
|
10 |
Windshield wiper motor cover No.2 |
2. Assemble in the reverse order of disassembly.
Windshield Wiper Motor Assembly Note
1. Connect the windshield wiper motor to the vehicle wiring harness connector, operate the windshield wipers, and then stop them at the auto stop position.
2. Disconnect the windshield wiper motor connector.
3. Install the windshield wiper motor to the main link and tighten the bolt.
4. Assemble the crank arm such that the crank arm and main link markings are aligned as shown in the figure.
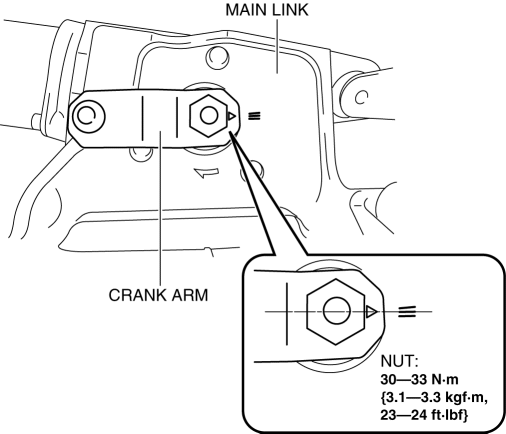
5. Install the washer and nut.
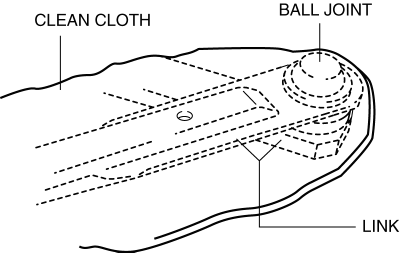
Ball Joint Assembly Note
1. Use a clean cloth to protect the link, and squeeze using pliers.
 Windshield Wiper Arm And Blade Removal/Installation
1. Remove in the order indicated in the table.
1
Cap
2
Nut
3
Windshield wiper arm
(See Windshield Wiper Arm Ins ...
 Windshield Wiper Motor Inspection
1. Disconnect the negative battery cable..
2. Remove the following parts:
a. Windshield wiper arm and blade.
b. Front fender molding.
c. Cowl grille.
d. Center cowl grille No.1, No.2
3. Di ...
Other materials:
Rear Brake (Disc) Inspection
Brake Judder Repair Hints
Description
1. Brake judder concern has the following 3 characteristics:
Steering wheel vibration
1. The steering wheel vibrates in the rotation direction. This characteristic
is most noticeable when applying brakes at a vehicle speed of 100—140 km/h {62.2—86.9
mph ...
Map Light Removal/Installation
1. Disconnect the negative battery cable..
2. Remove the tabs shown in the figure.
3. Pull the map light in the direction of the arrow (1) shown in the figure and
remove the map light while detaching the clips.
4. Disconnect the connector.
5. Install in the reverse order of removal ...
Specifications
Engine
Electrical System
*1 Q-85 is designed for i-ELOOP system. Only Q-85 should be used to ensure
correct operation of i-ELOOP
system. Consult an Authorized Mazda Dealer for details.
*2 Not for i-ELOOP system.
*3 This spark plug provides the SKYACTIV-G engine with optimum perfor ...
