Mazda 3 Service Manual: Accessory Socket Removal/Installation
Front
1. Disconnect the negative battery cable..
2. Remove the upper panel..
3. Remove the shift lever knob. (MTX).
4. Remove the selector lever knob. (ATX).
5. Remove the shift panel.
6. Remove in the order indicated in the table.
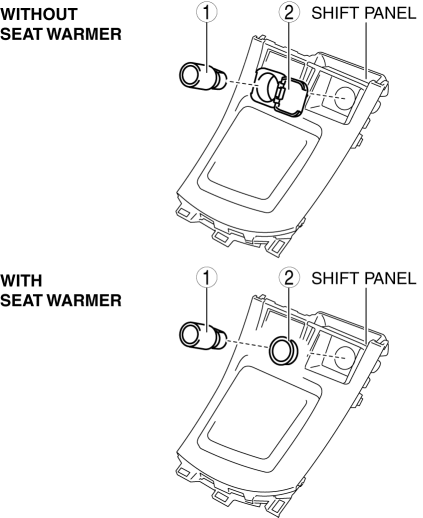
|
1 |
Socket (See Socket Removal Note.) |
|
2 |
Cap (See Cap Removal Note.) |
7. Install in the reverse order of removal.
Rear
1. Disconnect the negative battery cable..
2. Remove the following parts:
a. Upper panel.
b. Shift lever knob (MTX).
c. Selector lever knob (ATX).
d. Shift panel.
e. Side wall.
f. Console.
3. Remove in the order indicated in the table.
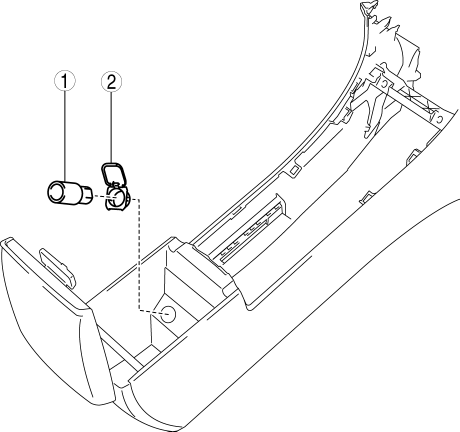
|
1 |
Socket (See Socket Removal Note.) |
|
2 |
Cap (See Cap Removal Note.) |
4. Install in the reverse order of removal.
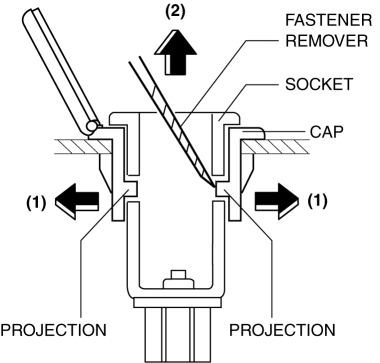
Socket Removal Note
1. Remove the socket in the direction of the arrow (2) shown in the figure while opening the caps in the direction of the arrow (1) using a tape-wrapped fastener remover.
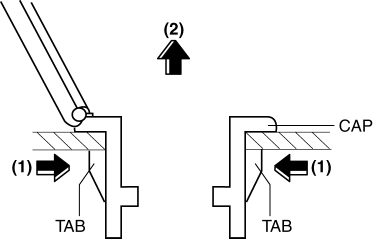
Cap Removal Note
1. Remove the cap in the direction of the arrow (2) shown in the figure while pressing the cap tabs in the direction of the arrow (1).
 Accessory Socket Inspection
Front
1. Disconnect the negative battery cable..
2. Remove the upper panel..
3. Remove the shift lever knob. (MTX).
4. Remove the selector lever knob. (ATX).
5. Remove the shift panel.
6. R ...
 Safety Systems
...
Other materials:
Climate Control Unit Removal/Installation [Full Auto Air Conditioner]
1. Disconnect the negative battery cable..
2. Remove the following parts:
a. Upper panel.
b. Shift lever knob (MTX).
c. Selector lever knob (ATX).
d. Shift panel.
e. Side wall.
f. Console.
g. Center panel.
h. Audio unit.
3. Remove in the order indicated in the table.
...
Side Panel Removal/Installation
1. Insert a tape-wrapped fastener remover into the position indicated by the
arrow in the figure.
2. Pull the side panel in the direction of the arrow shown in the figure, then
remove the clips and hook.
3. Pull the side panel in the direction of the arrow shown in the figure, while
de ...
Variable Swirl Shutter Valve Actuator Inspection [Mzr 2.3 Disi Turbo]
Operation Inspection
1. Remove the air hose..
2. Disconnect the vacuum hose from the variable swirl control solenoid valve.
3. Connect a vacuum pump to the variable swirl shutter valve actuator.
4. Apply vacuum and verify that the rod moves.
Vacuum
kPa {mmHg, inHg ...
