Mazda 3 Service Manual: Accessory Socket Inspection
Front
1. Disconnect the negative battery cable..
2. Remove the upper panel..
3. Remove the shift lever knob. (MTX).
4. Remove the selector lever knob. (ATX).
5. Remove the shift panel.
6. Remove the accessory socket (front).
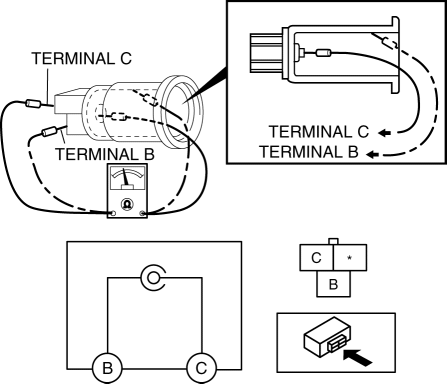
7. Connect a tester as shown in the figure and verify that there is continuity.
-
If the continuity cannot be verified, replace the accessory socket (front).
Rear
1. Disconnect the negative battery cable..
2. Remove the following parts:
a. Upper panel.
b. Shift lever knob (MTX).
c. Selector lever knob (ATX).
d. Shift panel.
e. Side wall.
f. Console.
g. Accessory socket (rear).
3. Connect a tester as shown in the figure and verify that there is continuity.
-
If the continuity cannot be verified, replace the accessory socket (rear).
 Power Sockets
...
 Accessory Socket Removal/Installation
Front
1. Disconnect the negative battery cable..
2. Remove the upper panel..
3. Remove the shift lever knob. (MTX).
4. Remove the selector lever knob. (ATX).
5. Remove the shift panel.
6. R ...
Other materials:
If the 12-volt battery is discharged
If the 12-volt battery in your Subaru Solterra becomes discharged,
specific procedures can be followed to restore power and restart the EV system safely.
These steps are designed to help you regain functionality in emergency situations
without causing damage to the vehicle’s electrical syste ...
Fuel Pump Control Module Inspection [Skyactiv G 2.0]
1. Perform the KOEO self-test..
2. Verify that a fuel pump control module related DTC is detected..
If DTCs are detected, repair the malfunctioning part according to the applicable
DTC troubleshooting..
If a DTC is not detected, go to the next step.
3. Inspect the followin ...
Keyless Control Module Configuration
1. Connect the M-MDS (IDS) to DLC-2.
2. After the vehicle is identified, select the following items from the initialization
screen of the IDS.
Select “Module Programming”.
3. Then, select items from the screen menu in the following order.
Select “Programmable Modu ...
